Authored by Colin Brum
At NCC Group, we like to give our interns real world hacking challenges. Over the course of a semester, we teach our students about software and hardware security. For a final project, we challenge our interns to apply what they’ve learned to find a vulnerability and develop an exploit against a real consumer product. We don’t always know in advance what kind of vulnerabilities to expect in the product, so sometimes the results can surprise us!
This blog describes how one of our interns Colin Brum was able to achieve root level access to an aftermarket automotive head unit, and how the head unit manages to compromise a user’s Bluetooth-attached phone. The head unit is the component that provides the screen and buttons to access the rest of the vehicle’s information and entertainment system, and frequently includes a great deal of complex functionality of its own.
The head unit we looked at was a Henhaoro G711HZA5. At the time of purchase in 2018, it was one of the more popular units on on Amazon.
Reconnaissance
After unboxing the head unit and reading the manual to determine the required supply voltage, we were able to turn on the device using our bench power supply.
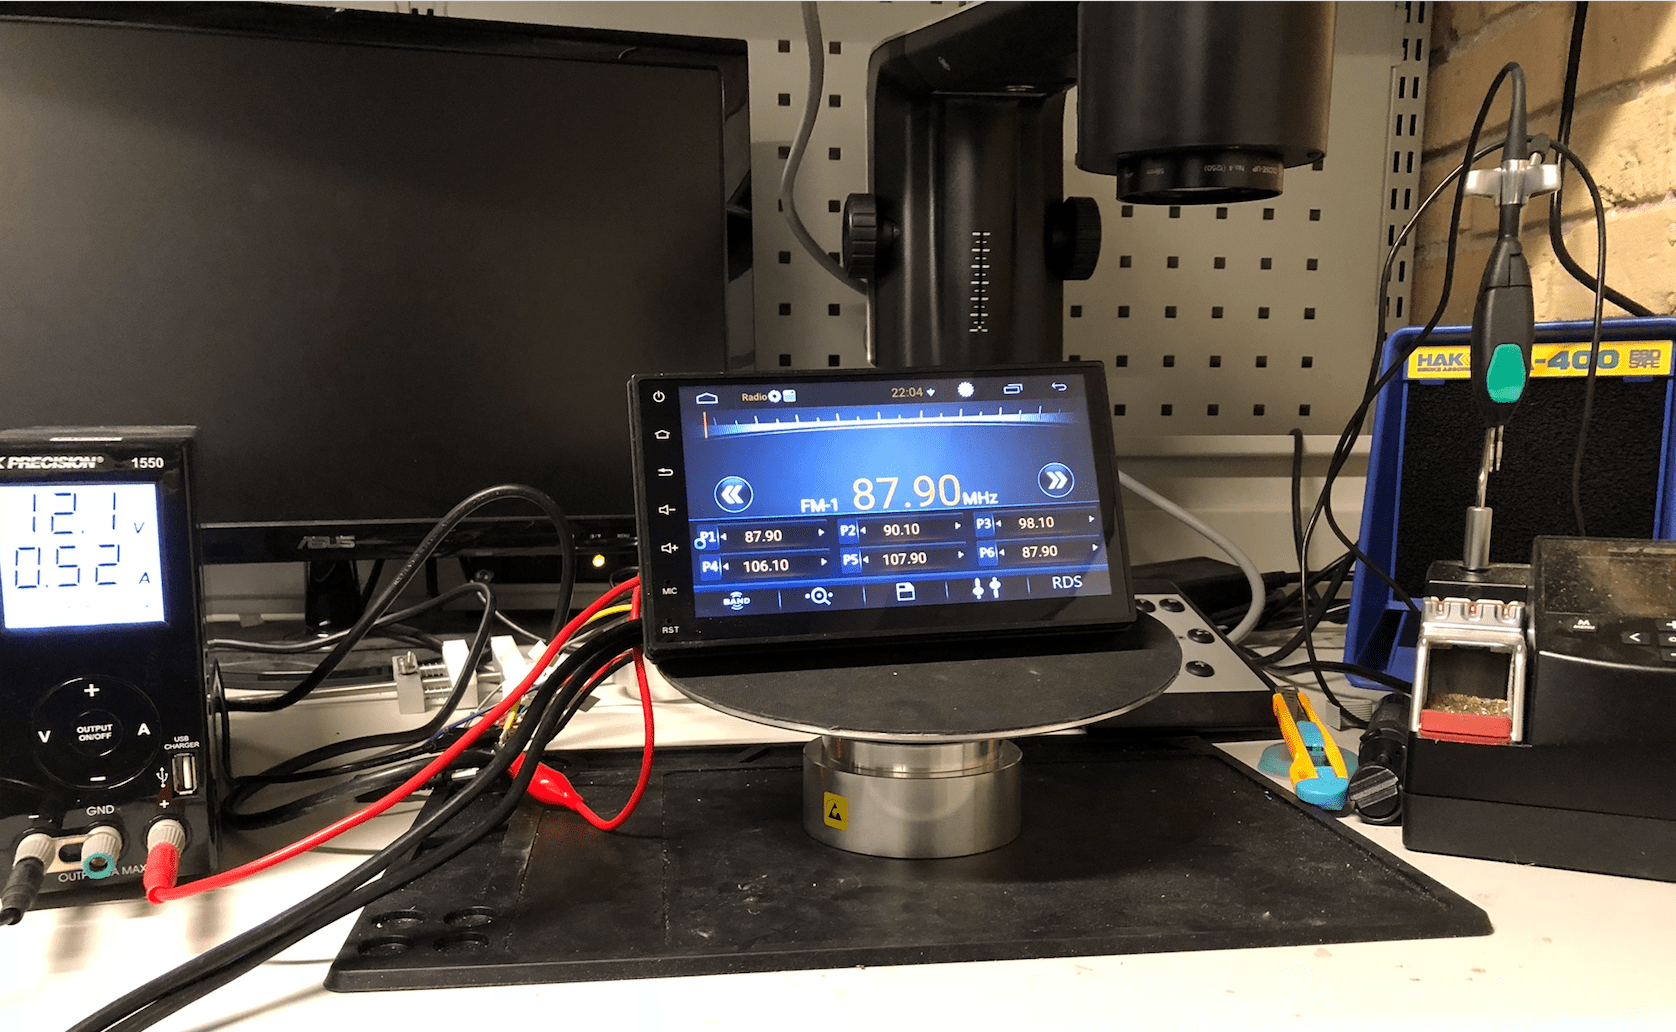
Typically, when we audit a device like this, our first step is to simply perform a breadth-first sweep and try to acquire a general high-level understanding of the device, its features, and the exposed attack surface.
In terms of features, the head unit has Bluetooth with hands-free calling support, built-in GPS, and WiFi. Media can also be streamed by connecting a phone to one of two USB ports, and the user’s phone screen can be mirrored onto the head unit as well.
This head unit runs the Android OS, and our preliminary scan revealed quite a few pre-installed applications, such as the Google Play Store, a navigation app called iGO, and EasyConnection, a driving assistant app. Getting familiar with the pre-installed apps was a good way to figure out the extent of the device’s functionality, and determine how it supports all of its features. These preliminary findings were then used to create an attack surface for the device.
Attack Surface
The following diagram shows a broad overview of the attack vectors that were considered in this device assessment, compiled from the enumerated functionality and our general experience in auditing embedded systems.
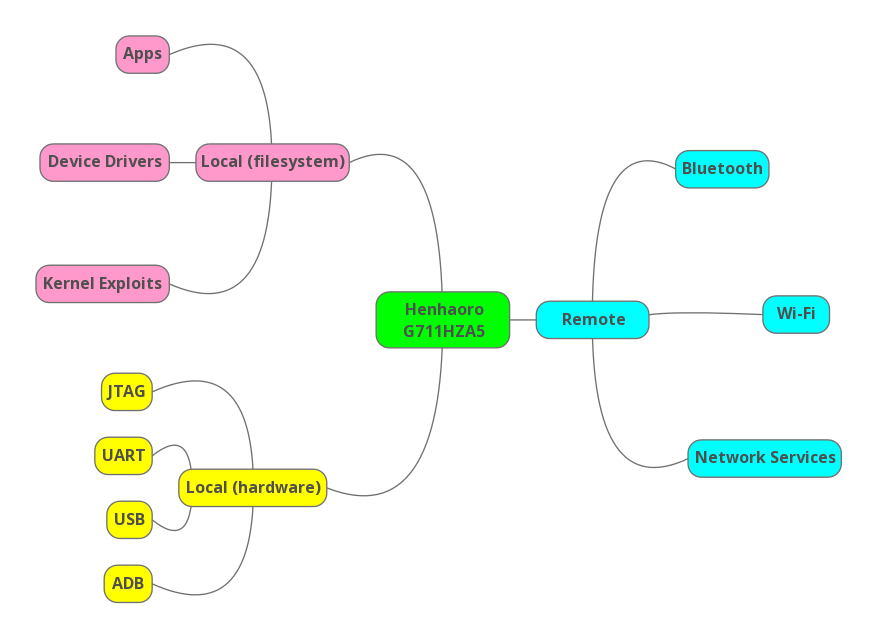
In this case, the attack surface was split up into three categories:
- Remote attacks
- Attacks requiring local access to the device filesystem
- Hardware attacks that require physical access
Remote vulnerabilities over Bluetooth and WiFi can be triggered by sending malformed packets to the device. Since the stacks for both are split between user and kernel space, a compromise could happen in either of these contexts. Additionally, any network services that open ports on the device may be interacted with and exploited by an attacker sitting on the same LAN.
Local attacks can be delivered through a malicious app that may be installed by a user. It may be possible for an app to escalate its own privileges, such as by exploiting the kernel, compromising a vulnerable device driver, or by attacking other more privileged systems processes. Frequently, local privilege escalation issues can also be triggered from the ADB shell.
Physical access provides many opportunities to compromise the device. For example, an evil USB device can enumerate a host-side USB stack and potentially attack it, the Android Debug Bridge (ADB) can be used to interact with the target, Joint Test Action Group (JTAG) interface access allows debugging and extraction of the unit’s firmware, and UARTs may expose kernel shells or bootloader consoles.
Hardware Teardown
Since we have physical access to the device, we started our audit of the Henhaoro with a hardware teardown. After disassembling the unit, the circuit board components were enumerated. Collecting datasheets for the chips gave us some guidance in our efforts to find debug access such as JTAG or UART.
Through this process, the following notable hardware was revealed:
- A Mediatek MT8127 SOC, which includes a 1.3GHz quad-core ARM Cortex-A7, 3D graphics, and DDR3 memory. This is the main processor on the board. It, along with its RAM (4) and flash (3) memories, is assembled on a separate module that is then soldered to the main board. Unfortunately, the datasheet for the MT8127 doesn’t seem to be publicly available.
- An STM32F030R8 MCU with a 48MHz ARM Cortex-M0, and internal flash and SRAM. This MCU is nowhere near as powerful as the Cortex-A7 and lacks the resources to run an Android system. It is expected that this processor is responsible for control functions on the main PCB. The datasheet is available here.
- A Samsung KLMAG2WEPD-B031 eMMC. From its proximity to the Cortex-A7 and its 16Gb capacity, we can assume that this contains the Android image. Here’s the datasheet.
- Two Nanya NT5CC256M16DP-DI DRAMs. Datasheet here.
- An RDA 5850SM Bluetooth radio transceiver and baseband processor. The datasheet is found here.
We also checked for exposed headers, test points, or connectors that could provide debugging functionality. Silkscreening could’ve also helped us here but there was very little to be found on this PCB. Overall, the two features of the board that looked most interesting from a security perspective:
- A `4 x 1` row of through-hole test pads that we soldered on a header to access.
- A row of connections between the external processing module and the main board. Here we expected to find all of the buses and connections needed to make the external module operate. We hoped to also find debug ports here.
Debug Ports
After the identification of interesting board features, the board was probed for both UART and JTAG. These debug ports, intended for development and sometimes manufacturing, are frequently present on embedded devices. They often grant privileged access without any authentication, and are thus valuable interfaces to identify early.
UART
Before describing the procedure to examine the PCB for UART, some background information about UART is necessary. UART provides asynchronous serial communication between two devices using a minimum of three wires: receive (RX), transmit (TX), and a shared ground. An important note for us security researchers is that the RX and TX lines idle high. Using this knowledge, we can probe the various test points with an oscilloscope to identify a number of candidate UART signals and rule out many more.
Importantly, we also identify the voltage requirements, which is required knowledge if we are to attach a TTL serial cable (such as common ones based on FTDI or CP2102 USB-Serial bridges). Once candidate signals are identified, the following procedure is followed:
- Attach the oscilloscope probe to the test point.
- Boot the device while monitoring the signal on the oscilloscope.
- If interesting activity is observed:
- Examine it to determine if it is normal serial traffic (i.e. start bit, 8 data bits, stop bit)
- Measure the baud rate if necessary.
- Repeat the above process for each candidate signal.
The above procedure can be used to identify any pins that are transmitting serial data during the boot process, which is often when such serial ports are very active.
However, the receive signal can be more difficult to detect. In order to identify the RX signal, typically you would attach a USB-TTL adapter cable (beware of voltage and baud rate settings) and test the remaining candidates one-by-one (starting with those candidates that are in proximity to the TX signal). During each test you can simply press the ENTER key within the terminal to attempt to send input to the device, and if you see any reaction on the TX line, then you may have found the right point.
Commonly bootloaders and kernels are configured with a console shell, and if so you will be in luck. On the other hand, if the port is configured in half-duplex mode (transmit-only), or if there is a blind unlock password, then the above technique will not succeed without more effort on the firmware reverse engineering side.
On this board, the 4 x 1 header labeled as ‘A‘ on the PCB was the first place checked for a UART. With the oscilloscope, two of the pins were identified as power and ground, leaving two pins that could have been TX and RX. Unfortunately, no serial traffic was observed.
We then moved onto the two rows of connections found on the main processing module (labeled as ‘B‘ above’). After enumerating candidate signals, all of them were observed with the oscilloscope but still no serial traffic was found.
Unfortunately, our efforts to locate the UART resulted in a dead end, so we moved onto JTAG.
JTAG
JTAG is a hardware test interface. The Joint Test Action Group defines the electrical specification and a simple serial shift register protocol. Beyond this, there is not much functionality described in the standard. That said, there are many defacto functionalities available through the JTAG interface on most devices: Invasive debug (breakpoints, memory and register read/write, etc), non-invasive debug (embedded trace macrocells, etc), Boundary Scan (allows access to external pins and devices), and DFT (Design For Test, is internal test functionality used by silicon foundaries to test devices).
Identification of this interface is typically done using either the JTAGulator or by reverse engineering the PCB and tracing the signals from the processor, using the processor’s datasheet as a reference. Complicating factors can include:
- Datasheets unavailable
- JTAG disable fuses could be programmed on the chip (most often this affects only software debug functionality, and JTAG, Bondary Scan, and DFT are still accessible)
- Once identified, non-standard TAP controllers might exist which make interfacing difficult (or require expensive hardware/software)
Related to JTAG, Single Wire Debug (SWD) is a low pin count serial interface that supports invasive and non-invasive debug. This too can be detected by the JTAGulator. DFT and Boundary Scan are not supported on this interface.
With this board we hit one of the complicating factors, as the main processor’s datasheet is unavailable. Without the datasheet, we would have needed to black box enumerate the 68 connections on the module for JTAG, which was numerically inconvenient. To narrow down the amount of possible JTAG signals, we could have reverse engineered the traces around the MT8127 to see which module connections were actually relevant. This would have been quite time consuming so we decided to put the hunt for JTAG on hold and move on to other, more convenient attack surfaces such as the ADB shell.
Google Play Shell
The efforts to find debug access through the hardware were stalled at this point, so we needed to think of another way to get an initial foothold that would allow for deeper investigations.
Looking back at the apps that were found on the unit initially, we were reminded that Henhaoro was nice enough to keep the Google Play Store. With the Play Store available, the easiest way to get a foothold was to install our favourite terminal app and run it!

This shell was a good start, but it had some critical flaws. Due to its UID/GID, it could not access much on the filesystem, and more importantly, typing on the small touchscreen was a frustrating experience.
For convenience sake, we hoped to upgrade to a more privileged, remote ADB shell that would allow us to run commands from the comfort of our own machine.
ADBD is the Daemon for me
It turned out to be very straightforward to obtain an ADB shell on the device. Using our terminal app, we restarted the ADB daemon first.

Then an ADB connection was made from our laptop:

The shell user is more privileged than the terminal app. So now it was time to begin gathering device information and enumerating potential paths to privilege escalation.
Enumerate, Enumerate, Enumerate
To start with, basic information about the device was obtained. This let us know what date the kernel was built on, and confirmed the Android version and API level.

More build information was found in the property ro.build.fingerprint.

Right away, we recognized that the build target was userdebug, which means that ro.debuggable=1, and ADBD was built with ALLOW_ADBD_ROOT defined. It should be possible to access a root shell through ADB.
Additionally, since this build was signed with Google’s public test-keys it may be possible to replace system apps built into the OS image, although we didn’t attempt this.
Continuing with build-related information, we next explored dm-verity. Dm-verity is a feature implemented on all modern Android devices that cryptographically validates the integrity of the file system on each boot before it is accessed. This extends the Secure Boot process to cover the application layer. The presence of dm-verity was investigated first by searching for the verify flag in /fstab. The lack of the verify flag is a strong indication that dm-verity is not supported. Additionally, there were no dm-* devices found in /dev/block which would be present if dm-verity was enabled.

SELinux status was checked as well. This is a mandatory access control policy that, when enabled, and configured with strong policies, can add significant defense-in-depth to a system. It was determined that SELinux is not in enforcement mode on this system, and so is effectively disabled.

Android system properties related to ADBD running as root were determined, as misconfigurations could lead to easy root escalations. The state of the ro.debuggable property hinted at a potential privilege escalation as mentioned earlier. However, we continued enumerating to be as thorough as possible and attempted this escalation later.

Next, any open ports were discovered. Apart from ADBD listening, only one other port was open locally.

Continuing on, processes running on the device were recorded. This is a small sample of the many processes at work on the device.

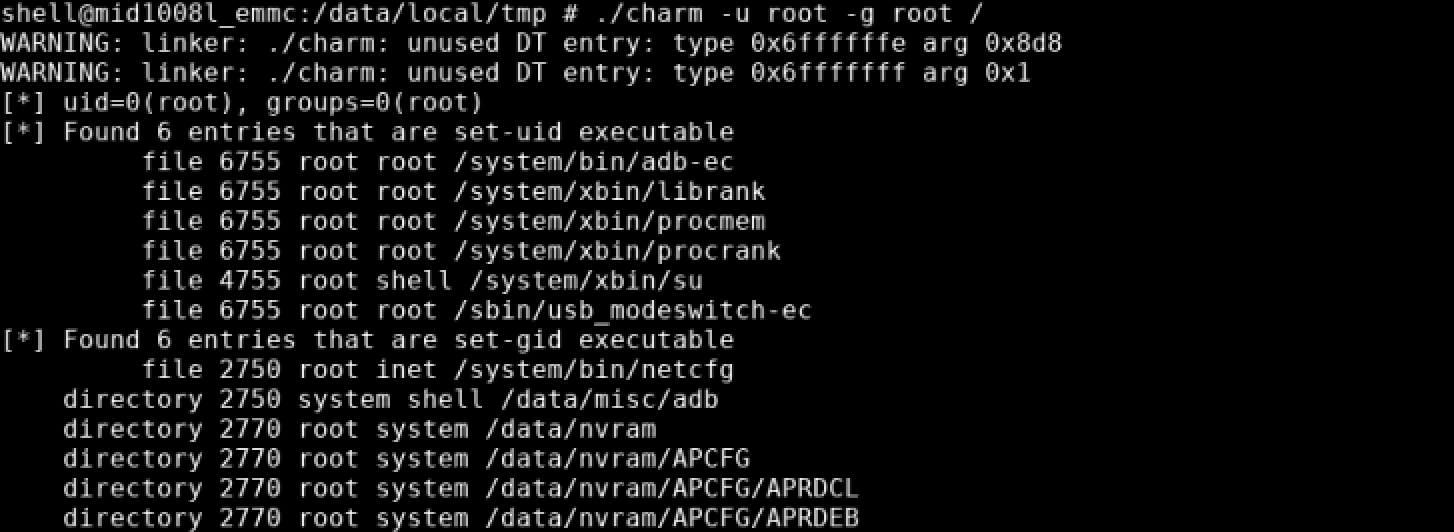
Finally, SUID/SGID binaries were identified. Wow! Someone was nice enough to leave a su binary for us.
Root!
An easy, albeit anticlimactic, root shell was obtained using su. That’s right, it was that easy. In retrospect, perhaps we gave the security of this head unit too much credit, and we should have just tried to su in the first place.

We also tested the potential privilege escalation discovered earlier from the build information was tested. First ADBD was restarted as root. Then the daemon was connected to. ADBD successfully restarted as root and connecting gave us a default root shell.


Unsurprisingly, userdebug builds are not safe for production purposes.
There’s COW in my Kernel
Now imagine that Henhaoro decided to update their firmware to a user build that doesn’t have a su binary lying around and is not debuggable by default. What would we do?
Since the device is running an out-of-date 3.10 kernel, surely there’s a public exploit that can be used to get root. Remember Dirty COW? Conveniently, someone made an automated script for the exploit found here.
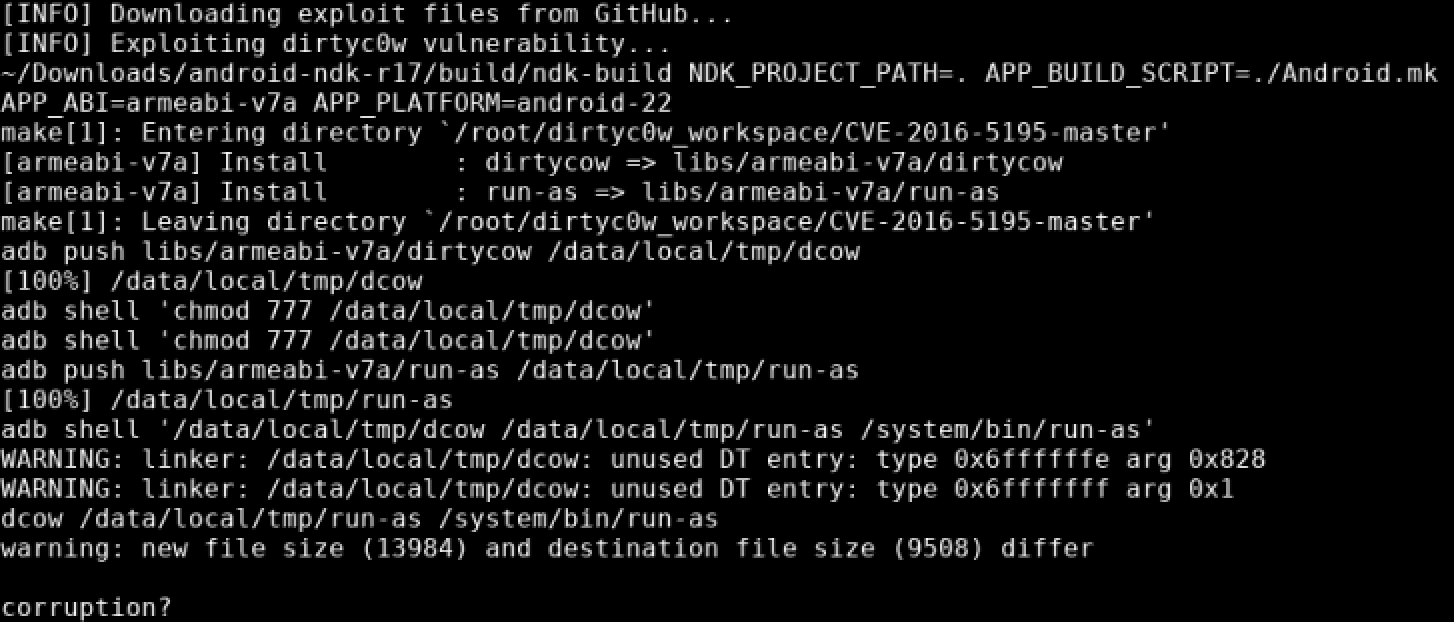

We were able to root the unit again without the su binary! The image for this device was built on July 10, 2017, seven months after it was reported by Google that Dirty COW was patched. However, this Henhaoro product is still vulnerable.
You Broke My Trust
One of the system apps found on the head unit is a driving assistant application called EasyConnection. This application is able to mirror the screen of a connected phone on the unit’s display, turning it into a GPS or music player.
To perform screen mirroring, EasyConnection prompts users to enable USB debugging on their phones. Enabling USB debugging is a serious security risk because it exposes users to potentially malicious USB connections such as public charging stations.
If the user does not understand the impact of their choice, then they may be tempted to trust every device they connect their phone to. We believe it is extremely unsafe for EasyConnection to suggest users enable USB debugging.
In effect, this means that a malicious Android app on the head unit can use the exact same methodology to install arbitrary application files (APKs) onto the user’s phone.
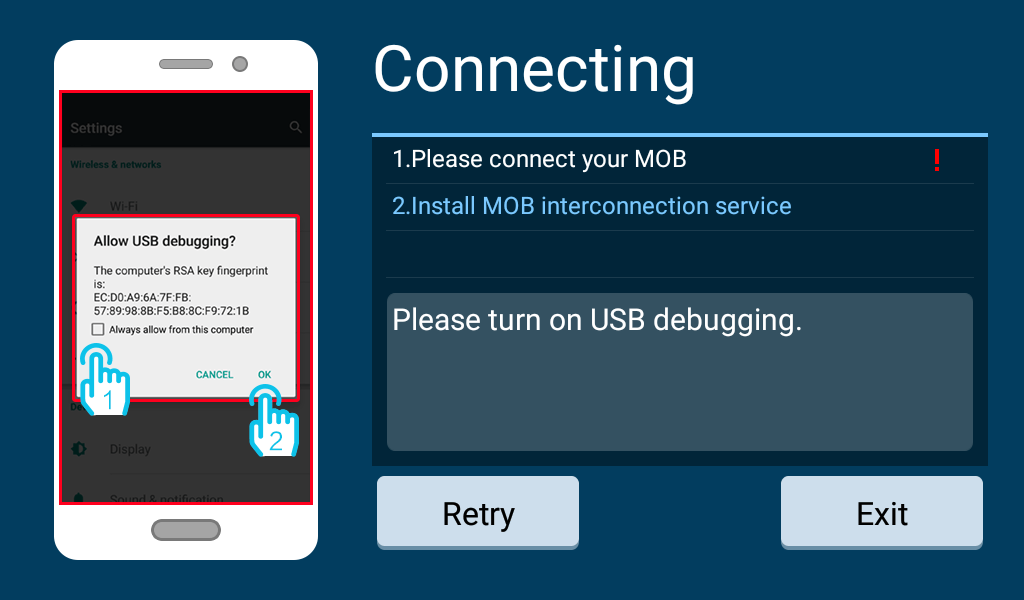
Next the head unit will use the usb_modeswitch-ec binary to switch itself from a USB master to a USB slave. Then, a custom ADB client named adb-ec will connect to the user’s phone over ADB and force the installation of the two APKs.
As if the risk of side-loading unknown applications on your phone wasn’t bad enough, one of the APKs that gets pushed onto the user’s phone tracks and exfiltrates data such as:
- Latitude/Longitude
- IMEI/IMSI
- Carrier
- Network
As expected, the user would be blissfully unaware that EasyConnection has compromised their phone’s security and has begun to harvest personal information. Similar data collection schemes in other products have run afoul of consumer protection agencies like the FTC.
Conclusion
Currently, installing this unit represents a significant security risk to the user and we advise against its use. It appears that security was not a major focus in device development.
The device was built in a debug profile that enables trivial root escalations, dm-verity and SELinux were not enabled, the kernel is old and unpatched, and the head unit attempts to coerce users to enable USB debugging so that it may install applications on your phone which harvests personal information.
These issues could be fixed by a significant firmware update from Henhaoro, but the company did not respond to our inquiries when we attempted to disclose these findings.
Disclosure Timeline
2019-04-05 – No security contact found on website. Emailed richard@cnhenhaoro.com requesting preferred disclosure method. No response was received by the time of publication.
