This is the last of three code-centric blog posts on pairing based cryptography. Support for these operations in an Ethereum precompiled contract has been proposed [1], and support for a related pairing configuration in precompiled contracts is already in operation [2, 3]. The first post [4] covered modular arithmetic, finite fields, the embedding degree, and presented an implementation of a 12-degree prime extension field tower. The second post [5] covered the needed elliptic curves, described the implementation of quite a few group/curve operations, showed how the necessary input validation is performed and finished with a presentation of the sextic twist. Now, the series concludes with an implementation of the Miller loop and the actual pairing function, a demonstration of how their novel properties are used, and an overview of the BLS signature procedures [6].
These blog posts complement existing theoretical resources by placing a strong emphasis on actual working code. Everything will be demonstrated inside of just 200 lines [7] of Haskell accompanied by generous comments and whitespace. The source code is available at https://github.com/nccgroup/pairing-bls12381 to facilitate experimentation. We provide line numbers that match the source code in ./Crypto/Pairing_bls12381.hs [8] where all the action takes place. Note that the Filecoin project [9] also has some great examples written in Rust which provide a complementary perspective.
The Miller loop
At the heart of the pairing operation is an implementation of the Miller loop. The algorithm itself is presented and discussed in extensive detail in Ben Lynn’s PhD thesis [10] (and several other places) and is depicted below as it appears in section 3.9.2. We can immediately see a striking resemblance to the scalar point multiplication routine presented in blog post part 2. The loop in step 3 corresponds to iterating through each bit of the scalar from MSB toward LSB. Step 5 features point doubling while step 8 indicates point accumulation when the selected scalar bit is 1. The two key differences lie first in step 4, which contains the term TZ/V2Z that will correspond to doubleEval, and second in step 7 which contains LZ,P/VZ+P that will correspond to addEval; we describe both of these functions later. In the algorithm depiction below, the result is calculated and returned in x.
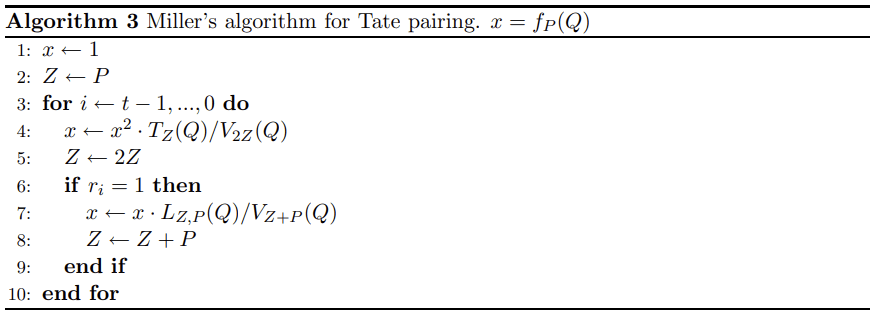
So, it should be no surprise that the Miller implementation presented below is structured very similar to that of scalar point multiplication that we saw last time. Lines 354-359 are the main miller function where the scalar is broken apart into a list of {True, False} for each bit. Then, the helper function is called with the initial point parameters and list of scalar bits to iterate through.
The helper function miller' on lines 363-370 recursively executes the inner Miller loop itself. Line 364 implements the terminating condition of an empty list of (recursive) iterations and is where the result is finally returned. Line 365 performs pattern matching such that the current scalar bit of interest is placed into i and the remaining list of bits are placed into iters for subsequent use. Lines 369 and 370 correspond to steps 4 and 5 in the algorithm above. If the current scalar bit of interest is false, line 367 uses the calculations from line 369 and 370 to complete the iteration by calling itself with adjusted parameters. Otherwise, if the current scalar bit of interest is true, line 366 takes the calculations from line 369 and 370 and additionally modifies the next recursive call with calculations on line 366 implementing steps 7 and 8 in the algorithm above.
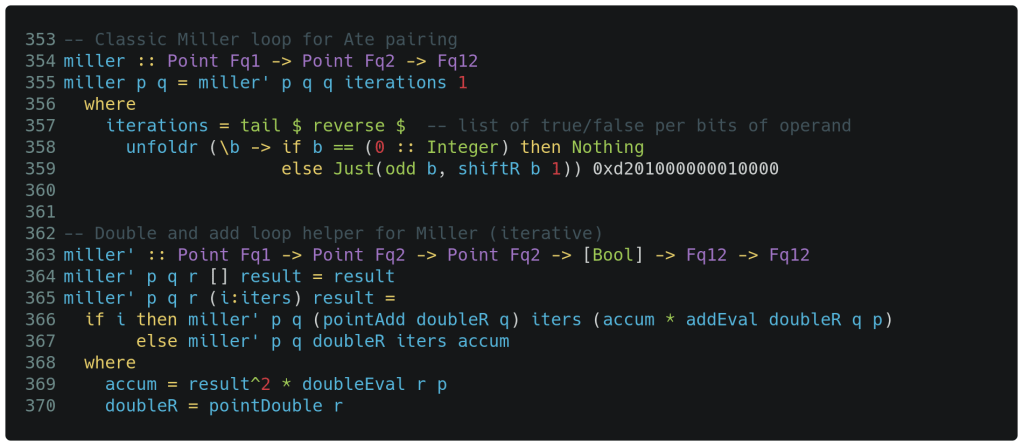
While the above logic may take some time to fully grasp, we also point out that the function signatures reference Fq1, Fq2 and Fq12. The original points supplied are in Fq1 and Fq2 while calculations involving the result are in Fq12. The latter calculations involve the values returned from doubleEval and addEval.
doubleEval and addEval
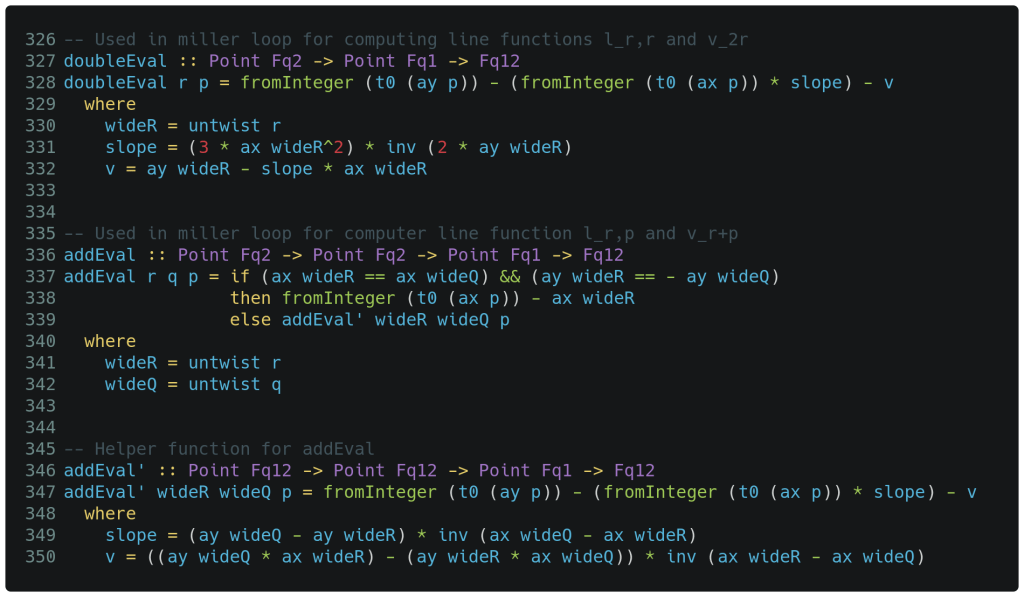
In the doubleEval function shown below, we start our review with the where clause starting on line 329. The first step is to map the supplied Fq2 point into a Fq12 point on line 330 via the untwist function that we presented last time (see the ‘sextic twist’). Similar to point doubling, we calculate the slope on line 331, the y-intercept v on line 332 and then evaluate a Fq12 to return with these values on line 328.
The addEval' helper function on lines 346-350 is quite similar to what we just described above. It is called with two ‘untwisted‘ points of Fq12, then calculates the slope between the two supplied points and their y-intercept on lines 349 and 350 respectively. All that remains is the addEval function itself. On lines 337 and 338 we see that if the function is called with two points comprising a vertical line, then we can directly build the result as shown – otherwise, line 339 delegates the calculation to the helper function which resembles point addition. Line 338 is a particularly interesting place to view the interplay of types – an Fq1 point is deconstructed with the x value put into a Fq12 x for use in calculating the result.
Pairing…at last!
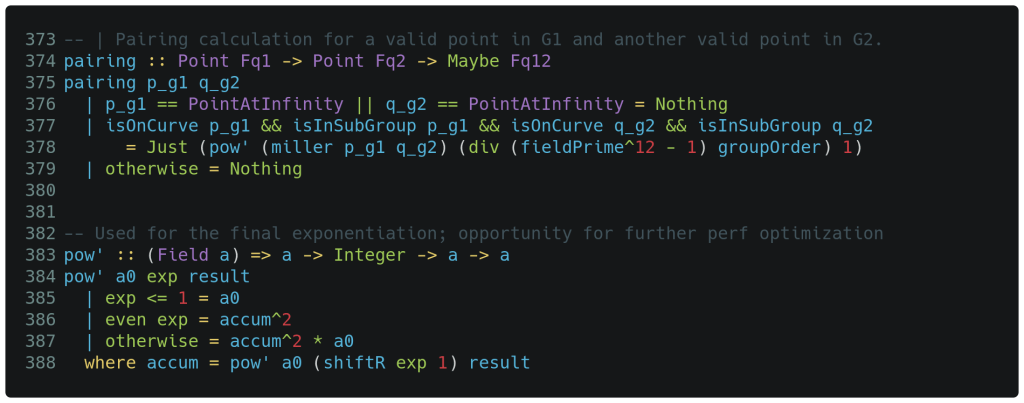
With the Miller loop and its inner functions doubleEval and addEval now in place, we are in a position to finish off the pairing calculation below. Lines 376 and 379 are simply housekeeping where we effectively decline to return a result in unusual circumstances. Line 378 exponentiates the Miller loop result to the power of (fieldPrime12 - 1) / groupOrder, which is a rather expensive operation. The actual exponentiation logic is shown at the bottom – a series of recursive square-then-multiply operations – and in our case, this is performed on Fq12 values!
Pairing Operation er()
Now that we have the pairing operation, let’s use it. Surprisingly, the primary interest in pairing is not the individual result, but rather the multiplicative relationships between separate calculations. As formal definitions can obscure visualization, we will attempt an intuitive working definition here. Consider the first equation below: the first pairing operation er() takes a point that is a multiple of the group 1 generator g1, another point that is b multiple of the group 2 generator g2, and the result is equivalent to a second pairing operation er() on the generators alone with the scalar multiples present on the exponent as ab. We use that central equivalence relation to work out a few other useful variations next. The second equation takes the scalar [ a + b ] multiple of g1 on the left and the pairing er() is declared equivalent to distributing it across two separate pairing er() calculations multiplied together on the right. The third equation moves the scalar c multiple of g2 from the left to the scalar multiple of g1 on the right. Finally, consider the last equation where sk and H might be a secret key and message hash (numbers) respectively – we can see the sk scalar ‘move’ from the multiple of g1 on the far left to the multiple of g2 on the far right. Consider that the first point on the left side might be a signature, and the second point on the right side might be a public key. This final equivalence relation will ultimately be the core of our signature functionality. So the bottom line is that the pairing operation allows us to move scalars across different points and still confirm equivalence.

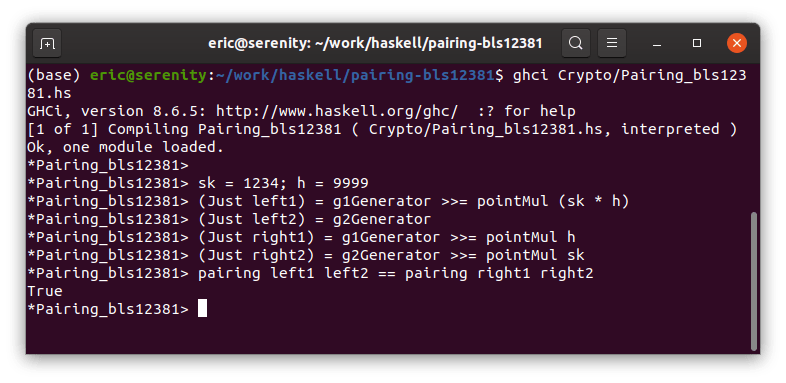
The screen capture below shows this last equation above in action. We load the Haskell interpreter, set the secret key sk to 1234 and the message hash h to 9999. These are simplistic values for demonstration purposes only – the code passes the full-fledged validation suite. We then calculate the pair of points needed for the leftmost pairing calculation, followed by the pair of points needed for the rightmost pairing calculation. Finally, we put the points into the two pairing calculations and confirm their resulting equivalence. Note that the left1 point is essentially a signature and the right2 point is essentially a public key. Ignore some of the funky intermediate syntax – it manages the Maybe/Just/Nothing values that are tangential to our purposes at the moment. We can see below in action exactly what the last equation above claims in principle.
BLS Signatures
Now we look at the draft-irtf-cfrg-bls-signature-02 [11] BLS signatures specification. The core sign and verify routines are are presented below in a slightly simplified fashion that removes some distracting (but very necessary) error checking.
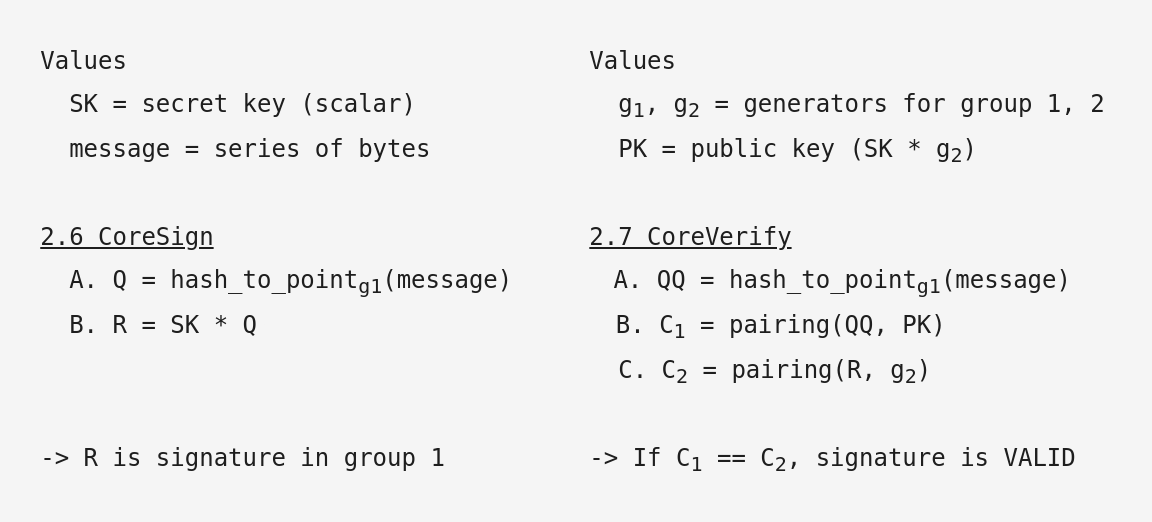
For signatures (left side of diagram below), the message is hashed to a valid curve point Q in group 1 [12] and that point multiplied by the scalar secret key SK. The resulting R is a Fq1 curve point that can be serialized into a 48-byte string signature, which is shorter than other schemes such as Ed25519. This is a very simple and very fast operation.
For signature verification (right side of diagram below), we see that the public key PK consists of the group 2 generator g2 multiplied by the scalar secret key SK. As group 2 is in Fq2, the public key point can be deserialized from a 96-byte string. The verifier uses the same message hash function to calculate their own hashed message point QQ, along with the public key, the signature and the group 2 generator g2. The validator simply performs two pairing operations C1 and C2. If the results of the pairing operations match, the signature is valid. This setup matches the screenshot above.
Let’s add some interesting (minor) complexity to the few paragraphs above. All of the operations on group 1 can be swapped with all of the operations on group 2 – the math is symmetric. This then yields 96-byte signatures from Fq2 and 48-byte public keys from Fq1 (instead of the reverse). As we see next, some use cases with more public keys than signatures would find this swapped configuration attractive.
Finally, we consider multi-party signatures. Note that R at above left is a curve point representing a single signature. If we had a dozen signatories, then a dozen signatures would be a dozen curve points, and they could simply be added together to produce a single curve point result representing a collective group signature. Wow!
For multi-party signature verification, consider the second pairing equivalence relation described earlier where summed scalar multiples on the leftmost point could be effectively spread into two separate pairing calculations on the right. Given public keys corresponding to each of the signatories, multiple iterations of the C1 pairing in step B (on right side) each using a single key could be multiplied together prior to finally multiplying by C2. This satisfies the equivalence relation and has effectively ‘moved’ the summed secret keys from the signature on the left into multiple pairing calculations on the right (each utilizing just public keys). As a result, we can easily verify multi-party signatures. This is an example of where swapping the original group 1 calculations with group 2 calculations could be attractive as multiple (shorter) public keys may need to be communicated alongside a single signature. The reader is directed to the draft signature specification [11] for even more context and detail.
What have we learned
The first post [4] covered modular arithmetic, finite fields, the embedding degree, and presented an implementation of a 12-degree prime extension field tower. The second post [5] covered the required elliptic curves, described the implementation of quite a few group/curve operations, showed how the necessary input validation is performed and finished with a presentation of the sextic twist. Now, the series concludes with an implementation of the Miller loop and actual pairing function, a demonstration of how they are actually used, and a discussion of the BLS signature application [6]. Everything is contained within 200 lines of working Haskell.
References
- https://eips.ethereum.org/EIPS/eip-2537
- https://eips.ethereum.org/EIPS/eip-196
- https://eips.ethereum.org/EIPS/eip-197
- https://research.nccgroup.com/2020/07/06/pairing-over-bls12-381-part-1-fields/
- https://research.nccgroup.com/2020/07/13/pairing-over-bls12-381-part-2-curves/
- https://datatracker.ietf.org/doc/draft-irtf-cfrg-bls-signature/
- Reported by the cloc tool at https://github.com/AlDanial/cloc
- https://github.com/nccgroup/pairing-bls12381/blob/master/Crypto/Pairing_bls12381.hs
- bls-signatures, pairing, group and ff at https://github.com/filecoin-project
- Ben Lynn PhD thesis https://crypto.stanford.edu/pbc/thesis.pdf
- draft-irtf-cfrg-bls-signature-02 https://datatracker.ietf.org/doc/draft-irtf-cfrg-bls-signature/
- Hashing to Elliptic Curves https://datatracker.ietf.org/doc/draft-irtf-cfrg-hash-to-curve/
I appreciate the significant efforts of Gerald Doussot in reviewing each of the three blog posts in great detail.
thank you!
