tl;dr
We’re going to look in detail at Microsoft Windows Firewall Hook drivers from Windows 2000, XP and 2003. This functionality was leveraged by the Derusbi family of malicious code to implement port-knocking like functionality. We’re going to discuss the problem we faced, the required reverse engineering to understand how these hooks could be identified and finally how the enumeration tool was developed.
Introduction
Background
Our Cyber Defense Operations team encountered the Derusbi family malware which implemented port knocking by registering a firewall hook. We’ll be releasing another post discussing the malware in detail but suffice to say what was missing was a tool to enumerate firewall hooks. This lack of capability led us to researching and developing the toolset to enable enumeration of these hooks.
Firewall Hook Drivers
To create a tool to enumerate the registered firewall hooks there was no need to develop a deep understanding on what firewall hooks are and how they really work. Learning about them is not easy as Microsoft did not publically at least provide too much information other than an introduction to the concept and some reasoning [1] on why not to use them.
However a very good guide written by Jesus Oliva on how to implement a firewall hook driver can be found on Codeproject [2] along with the source of a demo project. By reading the article and having a look at the demo project it was possible to obtain the amount of information necessary to get started.
It is also worth mentioning that this demo project – after modifying it to compile with Visual Studio 2010 – was very useful for testing the hook enumerator driver.
[1] http://msdn.microsoft.com/en-us/library/windows/hardware/ff546499%28v=vs.85%29.aspx
[2] http://www.codeproject.com/Articles/8675/An-Adventure-How-to-implement-a-Firewall-Hook-Driv
Reverse Engineering
Piece of Cake
A firewall hook driver can manage TCP/IP packets, allowing them to implement or extend host-based packet filtering firewalls. Registering a firewall hook can be done by sending an IOCTL request to TCPIP.SYS.
As can be seen in the Codeproject article mentioned previously, when registering or unregistering a hook, the address of the function, a priority and the operation to be performed has to be provided. The relevant code from the article can be seen below.
// Init structure filterData.
FirewallPtr = filterFunction;
filterData.Priority = 1;
filterData.Add = TRUE;
So how do we approach the problem?
- As it is possible to register and unregister firewall hooks, TCPIP.SYS probably maintains a list of registered firewall hooks.
- The list is probably an ordered list because of the priority. However this is likely not really relevant.
- The most important fact is that there will probably be some code to check if the callout is already registered. This code should have a similar flow as it can be seen below. This flow will be the pattern to look for in TCPIP.SYS.
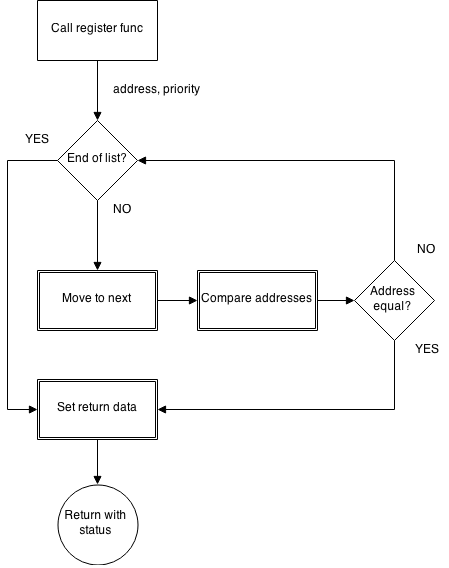
After locating this code and the address of the hook-list in memory within TCPIP.SYS it should be fairly simple to write a tool to iterate through the list and print out the address of the registered hooks.
FirewallUpdateQ
Loading up TCPIP.SYS in IDA Pro gives us a very pleasant surprise. TCPIP.SYS has public symbols provided and it is possible for IDA to retrieve TCPIP.PDB from the Microsoft Symbol Server. This makes the reversing process extremely simple because a quick search for the word “Firewall” in the function name window gives a short list of functions to look at.
As the lookup function is expected to be around the hook registering and unregistering function, the most logical choice is to have a look at the SetFirewallHook function.
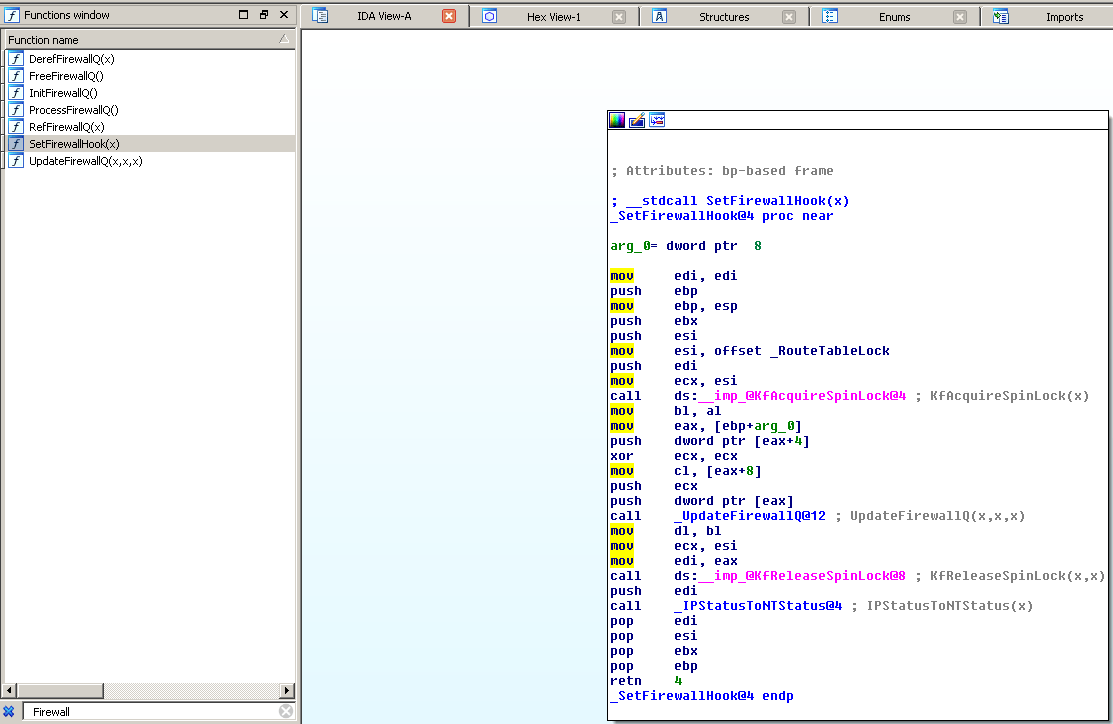
The code above is pretty straightforward, but there is not much interesting in there, except a call to the UpdateFirewallQ function. The UpdateFirewallQ function is more complex. Fortunately we have a graph view, which I find very useful as it makes it easy for example to spot patterns in the execution flow.
Having a look at the graph below it can be seen that the function starts with some initialization. This has been marked with an orange rectangle. The FQCounter and FQBlock variables are important, but more on these later. Right after the initialization there is a block which implements a loop. This has been marked with a red rectangle. Based on these, the following execution flow can be assumed:
- Initialization (orange rectangle)
- Checking if the hook is registered (red rectangle)
- Register or unregister the hook (rest of the function)
Now it is time to have a look at the details to see whether the assumptions in our strategy were right or not.
Initialization
As the first step, the initialization code was rearranged by moving position independent instructions in a way that makes it easier to create groups of relevant instructions (marked with different colors). This can be seen below.
.text:00029033 ; __stdcall UpdateFirewallQ(x, x, x)
.text:00029033 _UpdateFirewallQ@12 proc near           ; CODE XREF: SetFirewallHook(x)+25#p
.text:00029033
.text:00029033 var_4           = dword ptr -4
.text:00029033 arg_0           = dword ptr  8
.text:00029033 arg_4           = dword ptr  0Ch
.text:00029033 arg_8           = dword ptr  10h
.text:00029033
.text:00029033 ; FUNCTION CHUNK AT .text:000315FE SIZE 0000013F BYTES
.text:00029033
; This is for hot patching, not relevant
.text:00029033                 mov     edi, edi
; Stack setup, not relevant
.text:00029035                 push    ebp
.text:00029036                 mov     ebp, esp
; Saving register values, not relevant
.text:00029038                 push    ecx
.text:0002903E                 push    ebx
.text:00029042                 push    esi
.text:00029046                 push    edi
; Clearing out registers, not really relevant
.text:00029047                 xor     ecx, ecx
.text:0002905B                 xor     ebx, ebx
; The fun starts here...
.text:00029039                 mov     eax, _FQCounter
.text:0002903F                 and     eax, 1
.text:00029043                 shl     eax, 4
.text:00029049                 mov     esi, offset dword_51870
.text:0002904E                 lea     edi, _FQBlock[eax]
.text:00029054                 sub     esi, eax
.text:00029056                 mov     eax, [edi]

.text:00029058                 mov     [ebp+var_4], ecx
By analyzing both the initialization and the code in the red rectangle it can be seen that the instructions marked with gray are irrelevant for our analysis.
The chain of instructions marked with orange are working with the value held by the FQCounter variable. According to the instructions, the EAX register will hold 0x0 if the value pointed to by FQCounter is 0 otherwise EAX is 0x10.
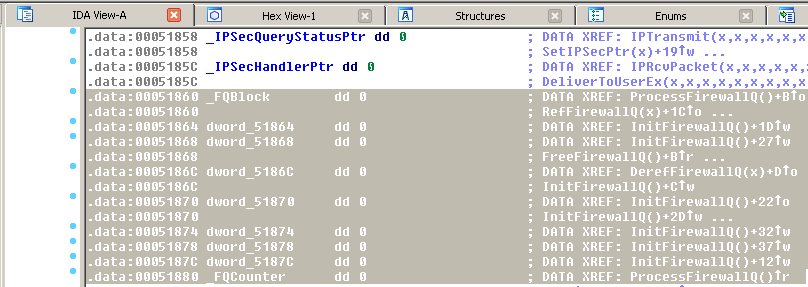
The instructions marked with red basically set up the registers for the lookup. As it can be seen on the picture below FQBlock is at a static offset (0x00051860), just as FQCounter (0x00051880).
What is important at this point is that:
- The EDI register will point to the first hook entry (the address of FQBlock) which is at offset 0x00051860 if no hooks are registered; otherwise the address is 0x00051870.
- The EAX register will hold the DWORD value located at the address within the EDI register.
Lookup
The code in the red rectangle starts with the following instructions:
.text:0002905D loc_2905D: ; CODE XREF: UpdateFirewallQ(x,x,x)+85D9#j
.text:0002905D cmp eax, edi
.text:0002905F jnz loc_315FE
According to this, the lookup continues until the data at the address pointed to by the EAX register is the address of the FQBlock, the beginning of the list. In C the loop would look something like:
PVOID eax = (PVOID)*(unsigned int *)FQBlockAddr;
while (eax != FQBlockAddr) {
    // to be done
}
To be able to finish the loop and learn what the list of hooks looks like the rest of the code inside the red rectangle is analyzed.
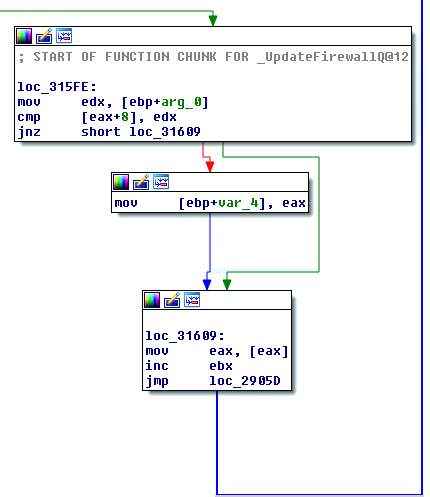
Given the information passed via the IOCTL request we can infer that the memory address of the hook to be registered or unregistered is basically the unique identifier. This means, the address of the hook is moved into the EDX register. Then, it is compared with the value at the address pointed to by EAX+8. The only reason for the comparison can be that the data at EAX+8 is the address of a registered firewall hook. Therefore, it is safe to assume the first argument to the UpdateFirewallQ function is the address of the firewall hook.
Then if there is a match, the value of the EAX register is moved into var_4, but this step is not relevant. After this the value at the memory address pointed to by EAX is moved into EAX.
To summarize:
- The first argument (arg_0) of the UpdateFirewallQ function is the address of the firewall hook.
- The structure of the list held in memory looks like this:
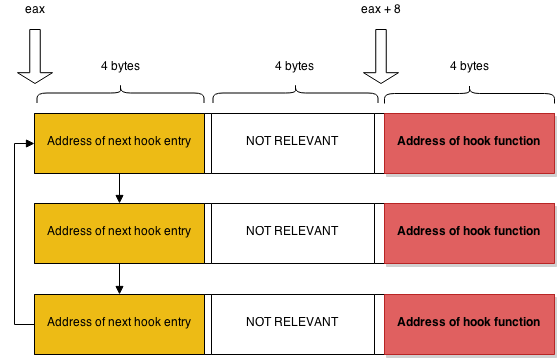
We can use this information to finish up our pseudo code loop:
This code then becomes the very core of a tool capable of printing out information about the registered firewall hooks.
PVOID FWHookCalloutAddr = NULL;
PVOID eax = (PVOID)*(unsigned int *)FQBlockAddr;

while (eax != FQBlockAddr) {
 /* FWHookCalloutAddr holds the address of the registered firewall hook */
 FWHookCalloutAddr = (PVOID)(*(unsigned int *)((unsigned int)eax+0x8));
 eax = (PVOID)*(unsigned int *)eax;
}
Development
Before going into the details of the development process lets provide a quick summary on the development environment itself.
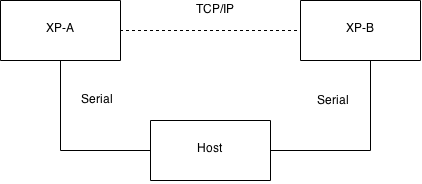
Two virtual machines were used. One, named XP-A was the development machine and XP-B was the test machine. Both were running Windows XP x86 with SP3 installed, connected via a virtual serial port using named pipes.
XP-A had the following tools installed.
- Visual Studio 2010
- Visual DDK – http://visualddk.sysprogs.org/
- WinDDK – http://www.microsoft.com/en-us/download/details.aspx?id=11800
XP-B only had Visual DDK installed. VisualDDK has a tool under $VISUALDDK_HOMEtarget$ARCH called DDKLaunchMonitor which basically allows the developer machine to transfer the driver (TCP/IP) and load it on the target machine.
Installing VisualDDK will provide a new project type in Visual Studio, called VisualDDK Driver Wizard. This wizard will literally create a basic driver which we can extend.
Developing the Windows Driver
The first big question was whether to go with a PnP or NT4 driver model. And the first mistake was made right there. I thought it makes sense to go with the PnP driver so I can just plug it in and play. When the development got to the stage of implementing dynamic driver loading it turned out that for a PnP driver I would have to create a phantom device as Windows refused to load the driver when there was no device with the given GUID present. With an NT4.0 driver model dynamic loading was way easier.
The other mistake I made was to implement the firewall hook enumerator first and call it from the DriverEntry. As a result, every time I made a mistake resulting in a BSOD (Blue Screen of Death) just a simple reboot of the machine was not enough. I instead had to restore Windows to a previous snapshot where the faulting driver was not loaded automatically at boot. The conclusion is: start with implementing the IOCTL handling first and then do the hook enumeration.
A good practice is to design your code first or at least develop an idea on how it should work. In this case, it was relatively simple. A very high level diagram of the design can be seen below.
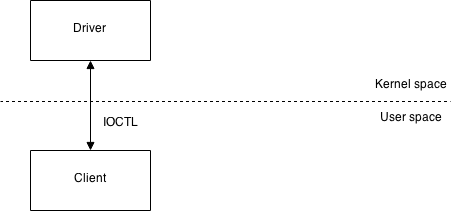
The Driver has to be able to perform the followings:
- Handle IOCTL requests
- Obtain the address of registered hooks
- Get the base address of the module holding the hook functions
- Get the size of the module
- Get the offset of the hook function relative to the module base address
- Get the full path of the module
And, the Client has to be able to deal with:
- Dynamic loading and unloading of the driver
- Sending IOCTL requests
- Processing the response received from the driver
So, the client should send an IOCTL request asking for the list of firewall hooks and additional details. Meaning, that there should be a buffer filled with these details. Of course we have to allocate memory for this buffer. The question is what should be the size of the buffer? If we let the driver deal with this then we have to use two IOCTL requests:
#define IOCTL_GET_BUFFER_SIZE     0x801
#define IOCTL_DUMP_DATA    0x802

#define IOCTL_Get_Buffer_Size     CTL_CODE(0x8080,
                            IOCTL_GET_BUFFER_SIZE,
                           METHOD_OUT_DIRECT,
                           FILE_ANY_ACCESS)
#define IOCTL_Dump_Data    CTL_CODE(0x8080,
                           IOCTL_DUMP_DATA,
                           METHOD_OUT_DIRECT,
                           FILE_ANY_ACCESS)
First, an IOCTL_GET_BUFFER_SIZE request is sent to the driver. The driver calculates the required buffer size in bytes and returns it to the client.
Second, the client allocated the memory for the buffer, based on the required buffer size.
WARNING: This approach works fine on a system where the number of firewall hooks does not change while the tool is running. But, this approach has a potential vulnerability which could be exploited by a malicious registered firewall hook.
There is a TOCTOU vulnerability here which if exploited could result in a Buffer Overflow.
A malicious firewall hook designed to detect our firewall hook enumerator could for example register an additional firewall hook between the 2 IOCTL requests (a race condition). The client allocates X bytes of memory after the first IOCTL response. When the buffer is passed via the 2nd IOCTL request to the driver the driver will move X+Y bytes into the buffer. To avoid a buffer overflow like this, we have the following options:
Use 1 IOCTL request, let the driver allocate the memory, fill it with the data and set Irp->IoStatus.Information to the number of bytes written.
Use 2 IOCTL requests. In this case the client should pass the size of the buffer with the request and the driver should take care not to overflow the buffer. The first approach seems to be more reliable and safer.
However we felt that this wasn’t serious issue as if a malicious firewall hook was present on the system already, and by virtue of that in Kernel, plus being designed to attack us or subvert our detection then there would be likely many other ways. Plus we also released a Volatility plugin for working on RAM dumps and thus not susceptible.
We wanted to mention this to emphasize show important it is to consider the ramifications of such design choices.
The following sequence diagram summarizes what it is to be achieved.
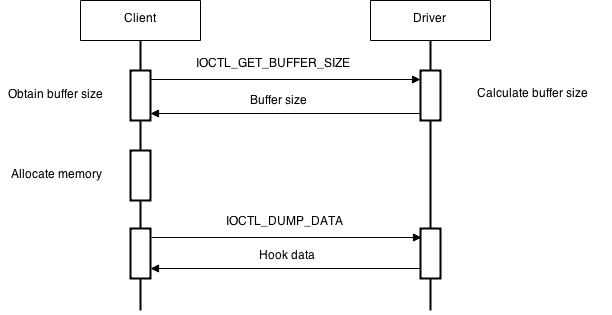
To be able to calculate the buffer size first, we have to define what information we would like to return to the client. The structure below servers this purpose well.
typedef struct _hookInfoEntry {
       ULONG calloutAddress;                    /* Address of the firewall hook (callout) */
       ULONG calloutOffset;              /* Offset of callout from moduleBaseAddress */
       ULONG moduleBaseAddress;          /* The address of the module in memory */
       ULONG moduleSize;                 /* Size of the module */
       USHORT fileNamePosition;          /* Points to the file name in fullPathName */
       UCHAR fullPathName[MAX_PATH];        /* Module full path, incl. the filename */
} hookInfoEntry;
We have one hookInfoEntry per registered firewall hook, therefore:
buffer_size = number_of_hooks * sizeof(hookInfoEntry)As we wanted to include additional information about the environment we were enumerating the following structure was also added to the start of the buffer.
typedef struct _hookEnvInfo {
 ULONG regHookCount; /* Number of registered hooks */
 ULONG FQBlockAddr; /* Address of FQBlock */
} hookEnvInfo;
This way, the driver calculates the buffer size according to the following formula.
buffer_size = number_of_hooks * sizeof(hookInfoEntry) + sizeof(hookEnvInfo)
Obviously, the number of registered hooks has to be known to be able to calculate the buffer size. Fortunately, thanks to our reverse engineering effort we already know how to determine how many hooks we have registered.
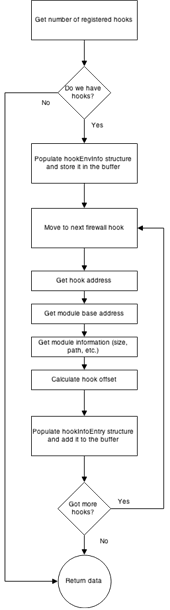
Once the buffer size returned by the driver the client allocates the memory and passes the pointer to the buffer to the driver via the IOCTL_DUMP_DATA IOCTL request. The diagram on the right gives a basic picture on how the “dump” request is handled by the driver.
Most of the process has been already explained. For the rest we are not going to go into detail but just mention a few interesting things that were relevant.
Getting the module base address
We use a technique that is similar to the way many exploits determine the base address of a loaded DLL.
PVOID getModuleBaseAddress(PVOID FWHookAddr) {
FWHookAddr = (PVOID)(((unsigned int)FWHookAddr | 0xfff) + 1);
while (strncmp((CHAR *)FWHookAddr, "MZ", 2) != 0) {
 FWHookAddr = (PVOID)((unsigned int)FWHookAddr - 0x1000);
}
return(FWHookAddr);
}
The above function calculates the module base address from the address of the registered hook (FWHookAddr).
Getting module information
To obtain the name and size of the module the AuxKlibQueryModuleInformation function was used.
Calculating the hook offset
Calculating the offset of the hook function relative to the module base is very easy and can be done by the formula below.
offset = hook_address - module_base_address
What we haven’t mentioned yet and according to the execution flow this is the first step: the initialization.
The prerequisite of being able to enumerate the firewall hooks is being able to find FQBlock, which as previously mentioned is a structure holding information about the registered hooks. For this, the following things have to be done:
- Find the base address of TCPIP.SYS
- Calculate the address of FQBlock
To find the base address of TCPIP.SYS we reused code from the following site:
http://alter.org.ua/docs/nt_kernel/procaddr
We implemented in a function called KernelGetModuleBase.
To calculate the address of FQBlock we implemented the following function.
PVOID findFQBlockAddress() {
       unsigned int FQBlock_offset = 0x00051860;

       PVOID addr = KernelGetModuleBase("tcpip.sys");
       PVOID pe_hdr = (CHAR *)addr + (unsigned char)*((CHAR *)addr + 0x3C);
       PVOID image_base_addr = (CHAR *)pe_hdr + 0x34;
       PVOID addr_FQBlock = (CHAR *)addr + (FQBlock_offset - *(unsigned int *)image_base_addr);
       PVOID FQBlockAddr = (CHAR *)addr_FQBlock + getFQCounter(addr_FQBlock);
       return(FQBlockAddr);
}
It basically retrieves the image base by parsing the PE header then calculates the address of FQBlock relative to it. As mentioned earlier, during the reverse engineering phase, the list of registered firewall hooks start at FQBlock + Value-of-FQCounter. The value of FQCounter is 0x10 if there are hooks registered; otherwise it is 0x00. Therefore, adding 0x10 to the address of FQBlock will result in a pointer to the first entry in the list of registered hooks.
Developing the Client
Developing the client was quite simple. I started with a standard Win32 console application template. As during the development VisualDDK handled the driver loading I left the implementation of the dynamic driver loading and unloading as the last step.
The client performs the following operations in order:
- Dynamic driver loading
- Obtaining the details of registered firewall hooks by sending IOCTL requests to the driver
- Display the information of the registered hooks
- Cleanup process
I will not go into the details of step 2 and 3. There are many useful guides on how to communicate with a driver via IOCTLs. Also, parsing the firewall hook data using the structures mentioned earlier and printing it to the screen should not be a problem if you are reading this.
What was a bit tricky is the dynamic loading of the driver. Prior loading the driver using the NtLoadDriver API the client had to perform the following steps:
- Get the path of the Windows directory
- Copy the driver to System32drivers
- Create registry key HKLMSystemCurrentControlSetServices
- Create the following sub keys:
- ImagePath – Full path to the driver.
- DisplayName – Name to be displayed for the driver. This is what you can see in the device manager.
- Description – An optional description of the driver.
- Group – Name of the group. In this case it was “Extended Base”
Not so surprisingly the cleanup procedure is about undoing all the changes in the reverse order:
- Unload driver using the NtUnloadDriver API
- Delete registry keys
- Remove driver from System32drivers
The result being the tool release here: https://github.com/nccgroup/WindowsFirewallHookDriverEnumeration/releases
Conclusions and Summary
Anyway we hope you enjoyed this post as it was an interesting little project for sure. We’ve walked through the problem, our strategy and each of the different phases which resulted in the implementation of the tool. Anyway until next time…
Published date: 19 February 2015
Written by: Zsolt Imre