Ben Humphrey – Malware Researcher
In late April 2018, NCC Group researchers discovered a small number of documents exploiting CVE-2017-8570 and dropping the same payload. The purpose of these documents is to install a Remote Access Trojan (RAT) on the victims’ machine. This article gives a deep analysis of both the document, and its payload. Special thanks to Principal Security Consultant Richard Warren for identifying these documents.
Figure 1 below shows a workflow of the malicious document and malware installation.
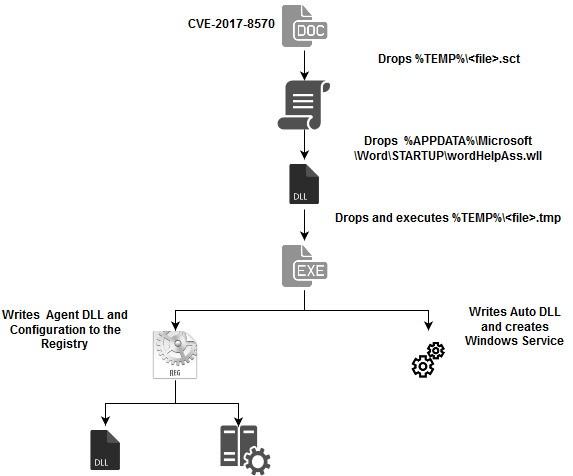
Figure 1 – Infection Workflow
CVE-2017-8570 RTF
As previously stated, the infection vector for the RAT is in the form of an RTF document exploiting CVE-2017-8570 (Figure 2).
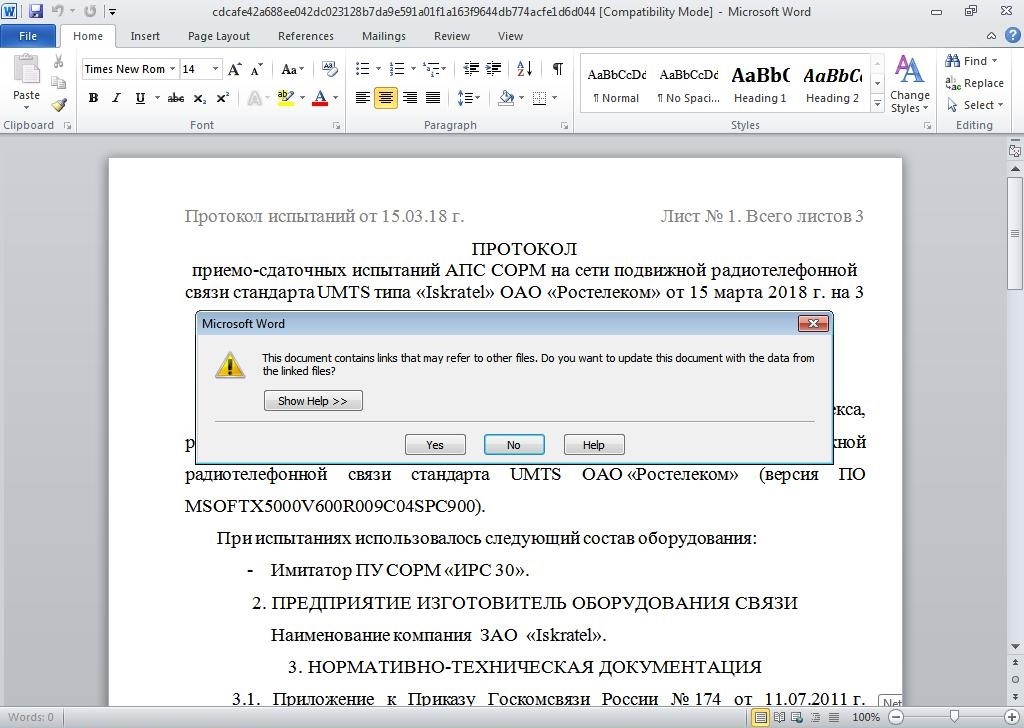
Figure 2 – RTF Opened in Word
Closer examination of the document shows that it is utilising the Package ActiveX control to drop and run an SCT file. This technique was blogged by McAfee a number of years ago (1).

Figure 3 – RTF Objects
The SCT file contains a block of obfuscated Javascript. There is a very large character array containing encrypted data, followed by an obfuscated decryption routine. The deobfuscated Javascript code (minus the large character array) can be seen in Figure 4.
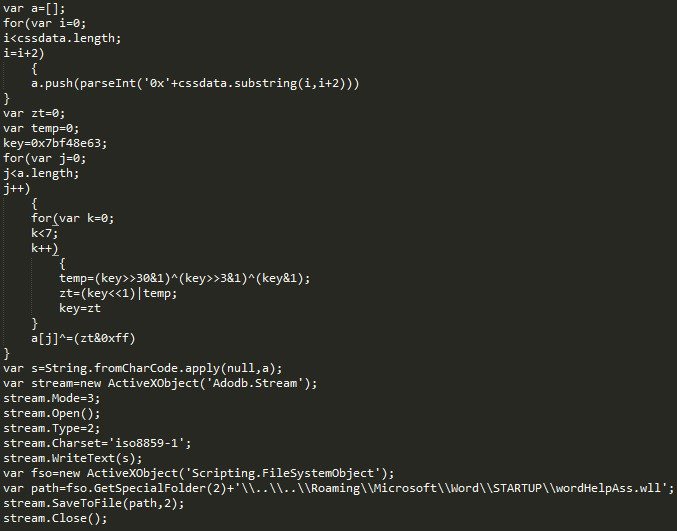
Figure 4 – Deobfuscated Javascript
What is a WLL file?
The purpose of the Javascript code is to decrypt and write the file “wordHelpAss.wll” to the Word STARTUP directory. A WLL file is actually just a normal DLL file. This technique is not new and has been described previously (2), but it is not a technique that we generally see in the wild. Another interesting point is that the payload does not get executed straight away. In fact, the WLL file will get executed when Word next opens. This thwarts automated analysis systems, as Word is generally not restarted during analysis. When the WLL file is eventually executed it will install the RAT payload.
Sisfader RAT
The payload installed by the WLL file is not a common RAT. We believe it to be either new or custom. Context Information Security, one of the other industry partners on the UK Cyber Incident Response scheme, has named this RAT Sisfader. We have adopted this name for consistency.
It maintains persistence installing itself as a system service and has multiple components as described in the table below.
| Component Name | Description |
| Dropper | This component is responsible for installing the malware |
| Agent | The Agent contains the main code of the RAT. It is responsible for communicating with the C2 server and executing the commands it receives. It is written to the registry in plaintext by the dropper. There are both x86 and x64 versions of the Agent. |
| Config | The Config is also written to the registry. It contains information such as the host identifier, and the C2 server URI. |
| Auto Loader | Loader The Auto Loader is responsible for extracting the Agent and the Config from the registry. It reads the Agent into its own address space and loads it manually (as opposed to using LoadLibrary). There are both x86 and x64 versions of the Auto Loader. |
Dropper
The dropper is an x86 PE file. It is responsible for installing the malware on the victims’ computer. The malware components are located in the droppers’ resource section as can be seen in Figure 5.
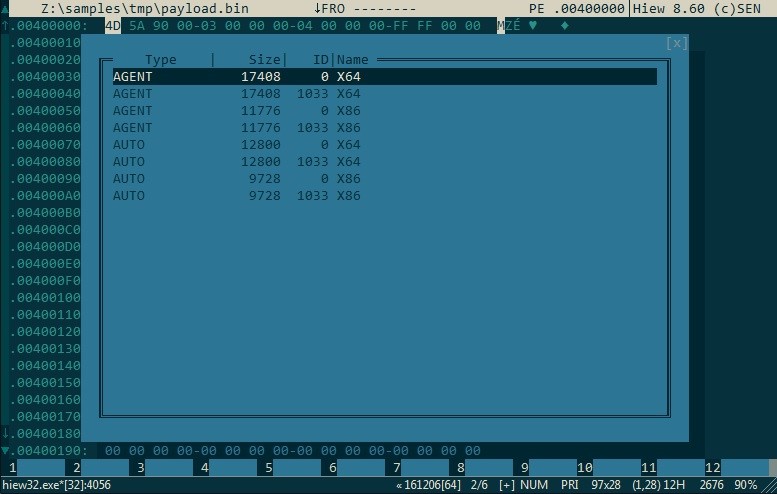
Figure 5 – Payload Resources
Flow of execution
The dropper begins with an anti-emulation trick that takes the form of a thread which repeatedly calls PostMessageA() with a parameter of 0x5ACE8D0A (see Figure 6). The main thread calls GetMessageA() and waits to receive a response. If the message parameter is not 0x5ACE8D0A, then the program will exit and the malware will not get installed.
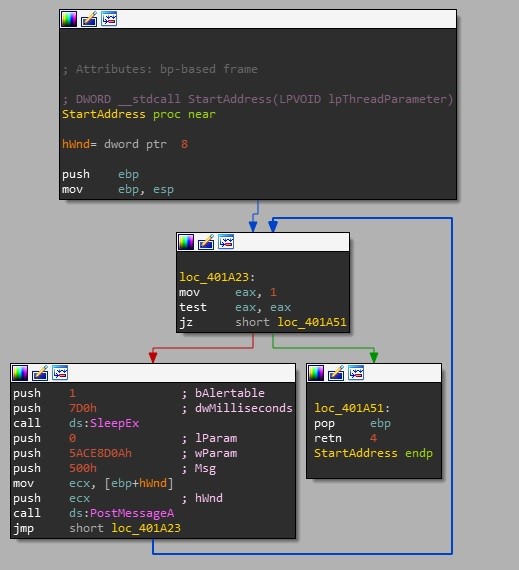
Figure 6 – Post Message Thread
The next step is to decrypt the Config, which is a 354 byte char array located in the .data section. The decryption algorithm used is a simple XOR loop using a 16 byte rolling key. Following this, the malware checks to see if it is running with elevated privileges. If it is not it will attempt to perform privilege elevation (the method for this is described later on in this post). The last step before installation is to generate a unique ID (a UUID) that is used for the C2 server to identify the host.
After figuring out the architecture of the system, the malware will write two components to the registry. The Keys that it writes to depend on whether it has successfully managed to elevate its privileges. If running as admin, it will write to HKCR. If not, it will write to HKCUSystemCurrentControlSetControl.
Data written:
| Reg Value | Type | Data |
| b | REG_BINARY | DLL file (in plaintext) |
| c | REG_BINARY | Config (in plaintext) |
Now it’s time to write the loader DLL, which enables the malware to maintain persistence. The AUTO resource is loaded, and copied into memory allocated with GlobalAlloc. Then a function is called that looks for a marker (0xFE19C04F). When the marker is found, the previously generated Host UUID is written.
The next step is to write the Auto DLL to disk. This can be in one of three locations, dependant on checks.
- C:WindowsSystem32iscsiexe.dll
- This file is actually overwritten. There is code in the payload to take control of the file so that the system does not attempt to write the original back.
- C:WindowsSystem32appmgmts.dll
- XP only. The payload will attempt to remove the original from the dllcache, so that the malware will not get replaced by it.
- %LOCALAPPDATA%AppUIHelper.dll
The malware is then installed as a service using one of the following names:
- AppMgmt
- MSiSCSI
The service is then started.
Injection and UAC Bypass
As previously stated, if the process is not already running as Admin, then it will attempt to elevate its privileges. Here is how it does it:
- Creates a new process (explorer.exe / select) with the
DEBUG_PROCESScreation flag. - Calls
WaitForDebugEventlooking for an event with the code CREATE_PROCESS_DEBUG_EVENT. - Injects (using
WriteProcessMemory) some code and a block of data (referenced by the code) into the explorer process.– This code performs the CMSTPLUA UAC bypass (3); restarting the malware payload with elevated privileges.– The code is injected at the entry point of the explorer process. This address is obtained from the_DEBUG_EVENTstructure which is returned by theWaitForDebugEventfunction. - Calls
ContinueDebugEventto resume execution of the injected explorer process.
This technique, although rare, is not new. It been around since at least 2013 when it was used by a bot called Win32/Napolar (4).
The Auto Loader
The main code of the malware is actually in the DllMain, not the ServiceMain function. The service itself doesn’t actually do anything.
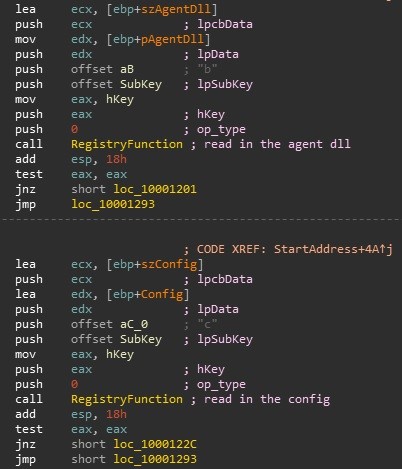
Figure 7 – Registry Setting Functions
The purpose of the Auto DLL is to simply extract the Agent DLL and Config from the registry (Figure 7), reflectively load the Agent DLL and call and export of the Agent (in this case, the Initialize function). The Initialize function will return the main malware function into a buffer. Then the agent calls it, passing the Config (Figure 8).
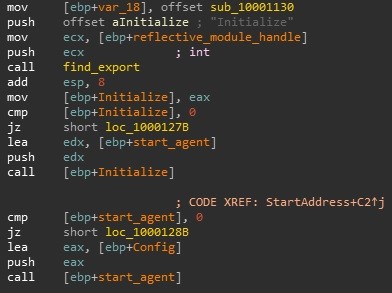
Figure 8 – Agent Initialisation and Execution
The Agent
The agent performs a handshake with the server, then listens for commands. It communicates over TCP. The communication port is found in the Config (in this case it’s 9000). All communications are prefixed with the DWORD: 0xFFDDEEAA
It initialises a structure which contains data for its operation. This structure is passed around to the network communications functions.
Network Communication
It has its own custom protocol for communication. The header is 0x24 bytes in length with any additional data following it. Header structure is as follows:
| Offset | Size | Description |
| 0x00 | 0x04 | Magic Bytes (0xFFDDEEAA) |
| 0x04 | 0x04 | Size of Command Data |
| 0x08 | 0x04 | Command Code (see Command Codes table below) |
| 0x0C | 0x04 | Command Parameter 1 |
| 0x10 | 0x04 | Command Parameter 2 |
| 0x14 | 0x10 | Host UUID |
| 0x24 | Variable | Command Data |
The Command Data is XOR encrypted with a 0x10 byte rolling key which is calculated from data in the Config.
In most cases, to acknowledge that the C2 has received the command, it will send back the same command code with no data.
Command Codes
| Command | Description |
| 0x0F01 | Register with C2 – sent by the host |
| 0x0F02 | Registration response from C2 |
| 0x0F03 | Update response from Host (for command 0xE0E3) |
| 0x1251 | StartProcess – Starts a process with a given command line. This is done with a call to CreateProcess |
| 0x1252 | GetDriveInfo – Send drive information back to the C2 |
| 0x1253 | FindFile – Check to see if a file exists |
| 0x1254 | CreateFile – Copy a file from the C2 to the infected machine |
| 0x1255 | ReadFile – Copy a file from the infected machine to the C2 |
| 0x1256 | GetFileInfo – Send file information back to the C2 |
| 0x1257 | DeleteFile – Delete a file from the infected machine |
| 0xE0E2 | Send Computer details to the C2 |
| 0xE0E3 | Update from C2. New Agent and Config is uploaded to the host and written to the registry |
| 0xF0E1 | Beacon – This is sent to the C2 every 10 seconds. It contains the tick count, obtained from GetTickCount() |
| 0xF0E2 | Ping – From the server. A way of checking if the victims computer is responding |
| 0xF0E3 | Pong – Response from Ping |
IOCs
File paths
- %LOCALAPPDATA%AppUIHelper.dll
- C:WindowsSystem32appmgmts.dll (XP only)
- C:WindowsSystem32iscsiexe.dll (overwritten)
Registry keys
- HKCR
b - HKCR
c - HKCUSystemCurrentControlSetControlb
- HKCUSystemCurrentControlSetControlc
Services
- AppMgmt
- MSiSCSI
URL
- cv3sa.gicp[dot]net
- kmbk8.hicp[dot]net
IP Addresses
- 103.255.45.200:9000
Files Analysed
- cdcafe42a688ee042dc023128b7da9e591a01f1a163f9644db774acfe1d6d044
- f1d99e124bf644cc20c7ac93701563ed19978bcf32337e3700b2fbc8a9023b82
References
- https://www.mcafee.com/blogs/other-blogs/mcafee-labs/dropping-files-temp-folder-raises-security-concerns/
- https://labs.mwrinfosecurity.com/assets/BlogFiles/WilliamKnowles-MWR-44con-PersistingWithMicrosoftOffice.pdf.
- https://gist.github.com/hfiref0x/196af729106b780db1c73428b5a5d68d.
- https://www.welivesecurity.com/2013/09/25/win32napolar-a-new-bot-on-the-block/.
Published date: 12 June 2018
Written by: Ben Humphrey
